Creating a Showing
Turning your template into a show and showings
Table of Contents
Shows in Agile are ticketed events and you will need an active template to complete this process so if you do not have one you should Start There.
Creating a Showing in ATS App
In the ATS App Shows are broken into Show, Showing, Tier/Inventory, and Event Price. The template you previously created will be used at the showing level and will pull in your Tier/Inventory and Event Pricing.
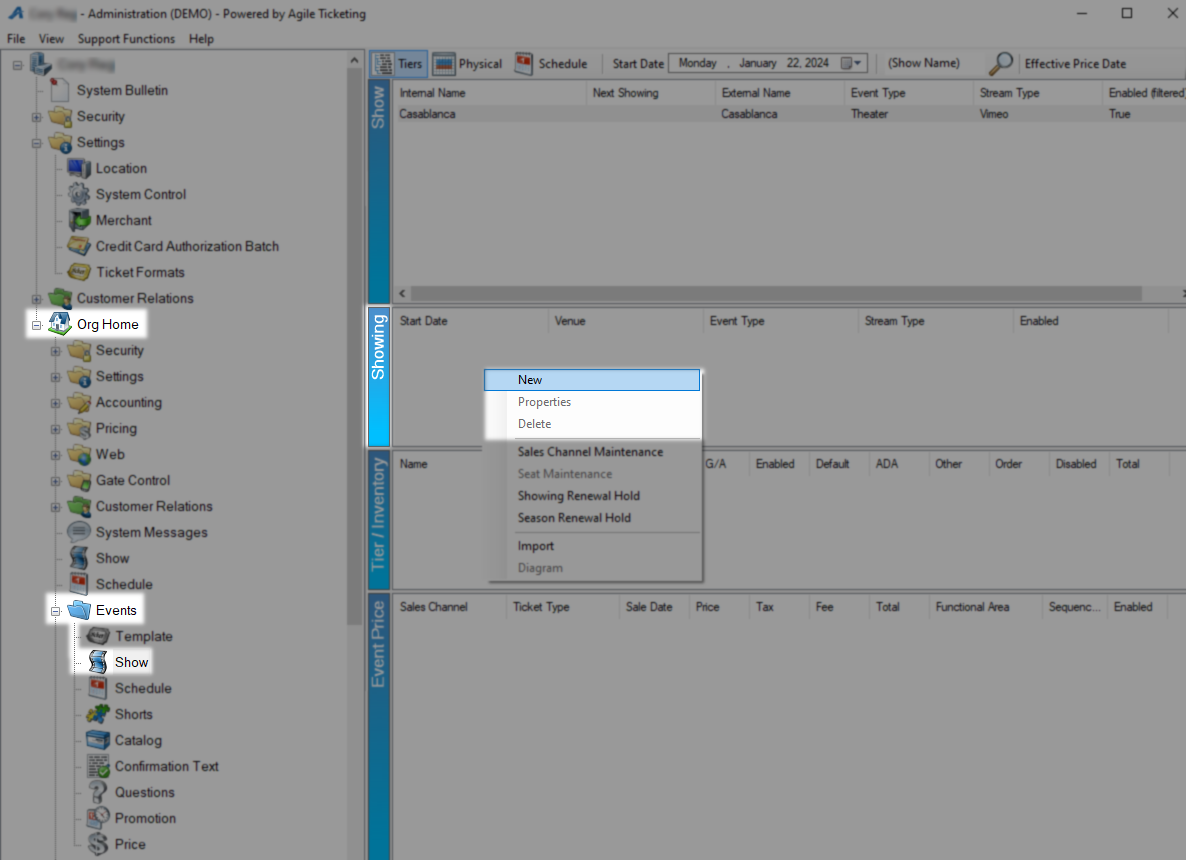
Begin by Logging In to ATS App administration and find the Blue Folder under your Organization House where your template has been built. In this folder locate and open the Show menu then right-click in the Show area and select New to get started.
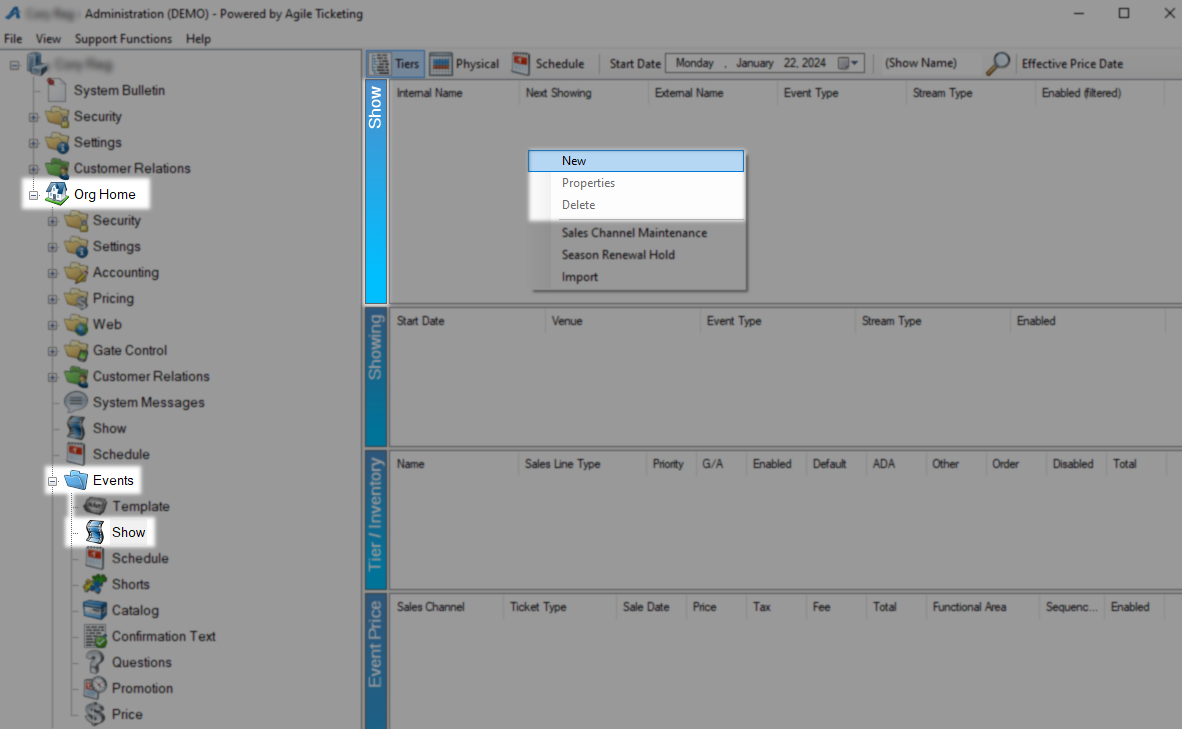
Show
On Show: New window you will be started on the General Tab and the first field to fill out is the Event Type which is the broadest category this show can fall into. Common examples for this field are theater, theatre, special events, or streaming. You can use the Ellipses to the right if you need to add a new event type.
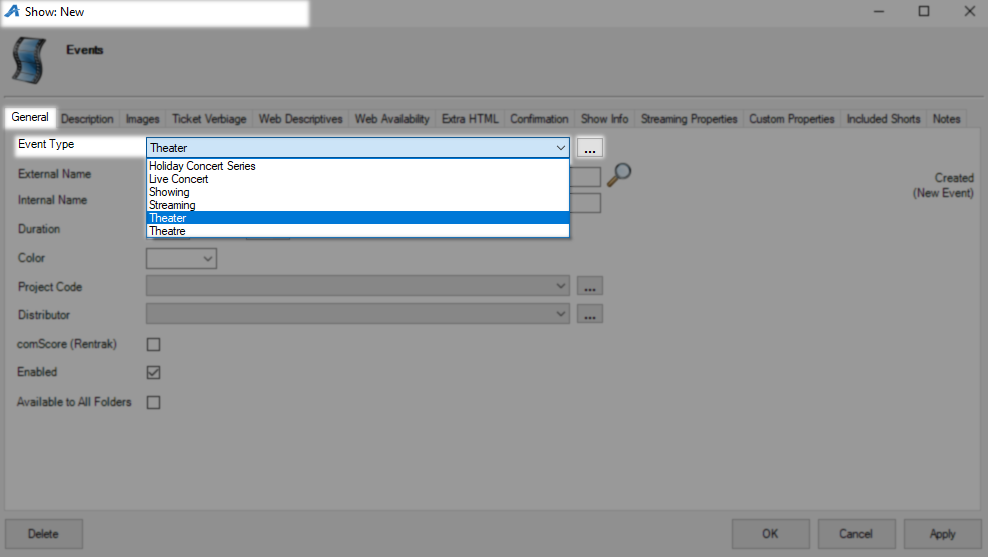
This is what adding a new Event Type will look like, click Add New and OK when you are done to return to the previous screen.

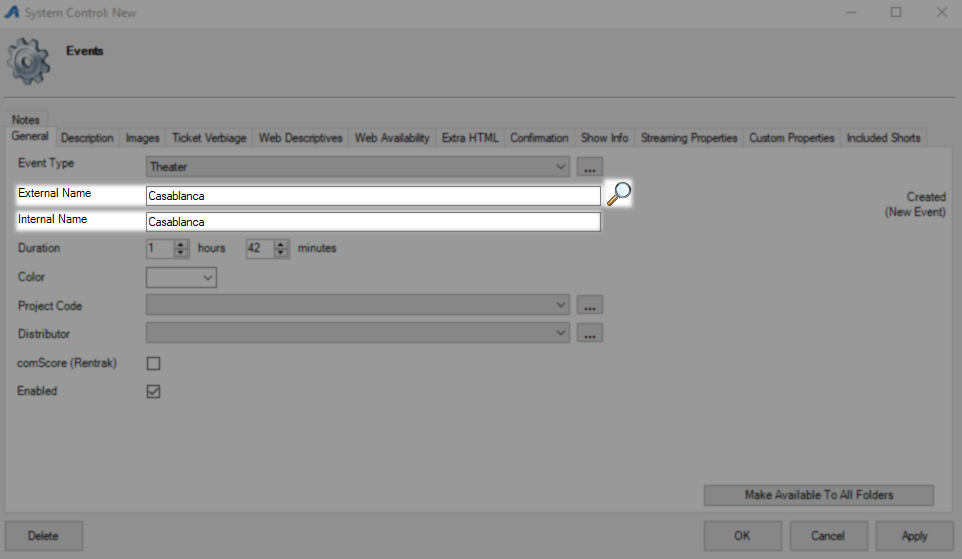
External Name is the customer-facing name that will appear online and on tickets. Internal Name is not customer-facing and will be used by the Sales side of Agile and the PoS system. If this show is for cinema use the Magnifying Glass to search the movie database and let it do the lifting for you. In the movie database, you will find films old and new as well as some live theatre, ask your rep to add this feature if it is not available.
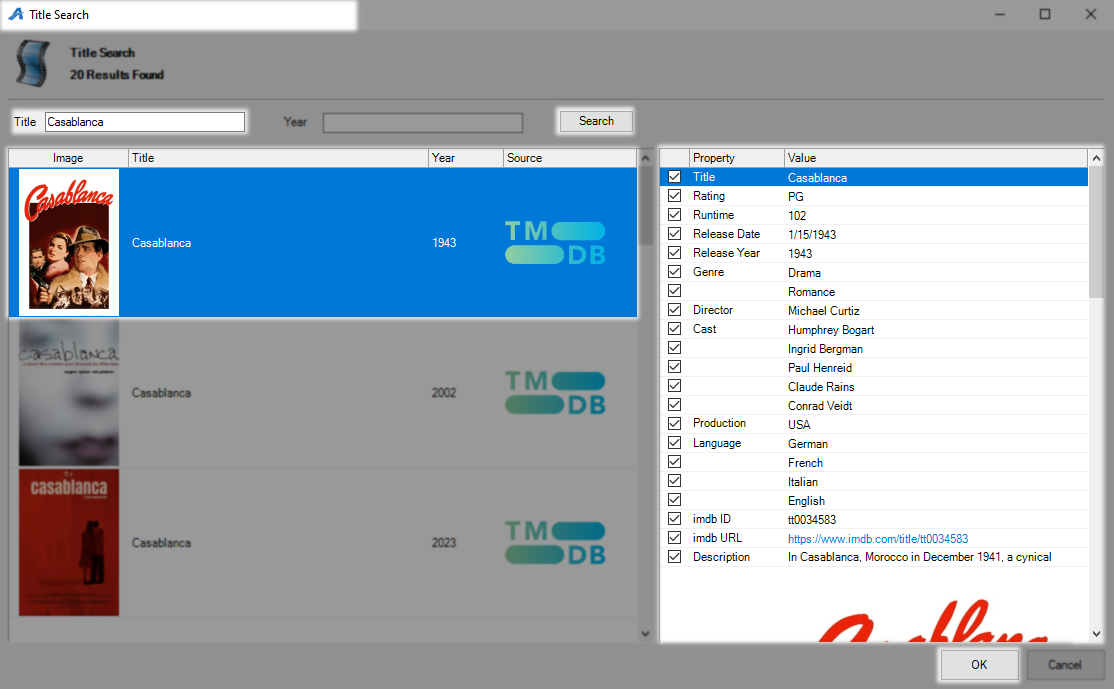
After clicking the magnifying glass you will be on the Title Search window where you can check for movie or show information. In the Title field put the name you are looking for and click the Search button off to the right. Select your show from the list and all of the information that will be pulled in will load to the right for you to preview. Click OK to load this show and return the the general tab.
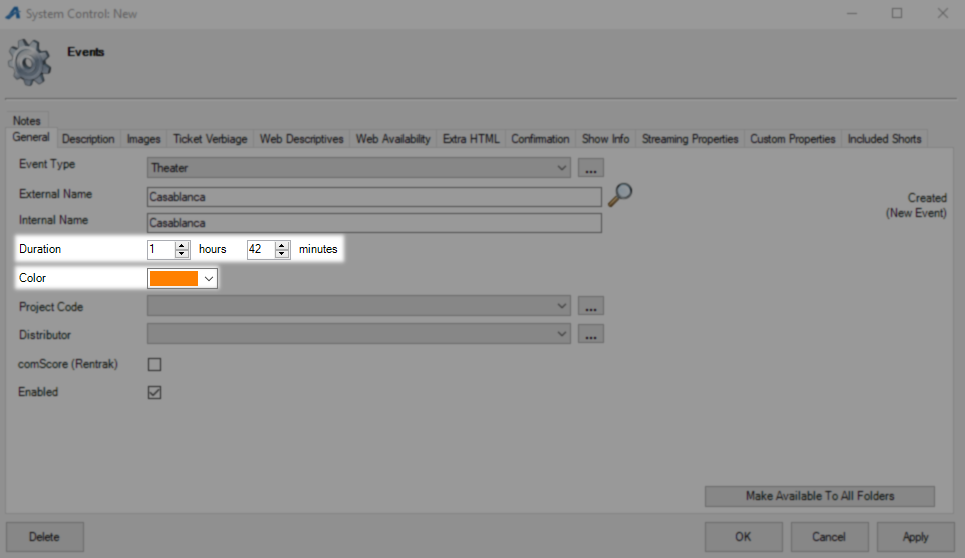
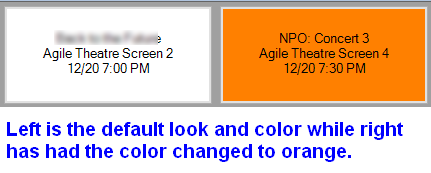
Duration is the total run time for this show which can be made customer-facing as well as how the system knows when to turn sales off. Color is a selection that will apply to the buttons that appear on your PoS system and as a border online, if left blank the default color of your buttons will be white.
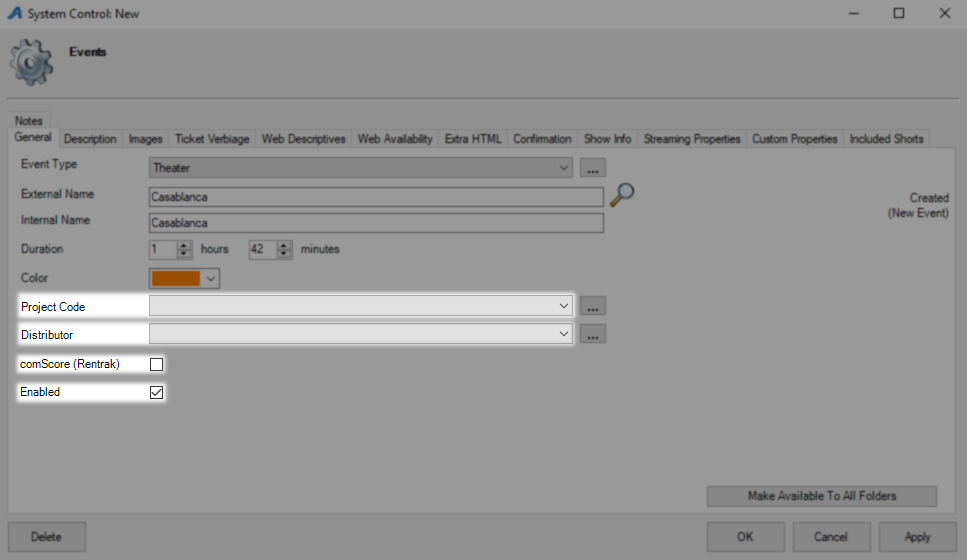
Project Code is used for internal reporting and does not affect the show being built. Distributor and the comScore check box allow for automated reporting of cinema events so activate both to have this film reported. Leave Enabled checked unless you are deactivating this show.
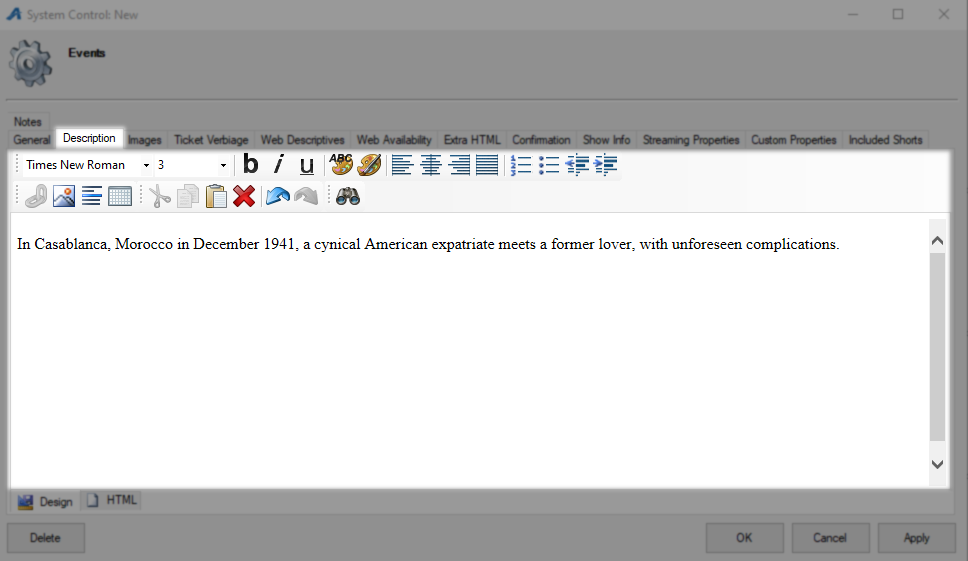
The Description tab holds the description for this show and will be displayed online for customers who view the full details.
The Images tab is your chance to add images, posters, or trailers for this show. Use the blue Upload button to add images from your PC to your ATS system and then Add Image button to apply them. The red Remove X will remove this image from this show but leave it in your system for later use. The Add Trailer button will prompt you for a link or embed URL that will be used to attach a trailer.

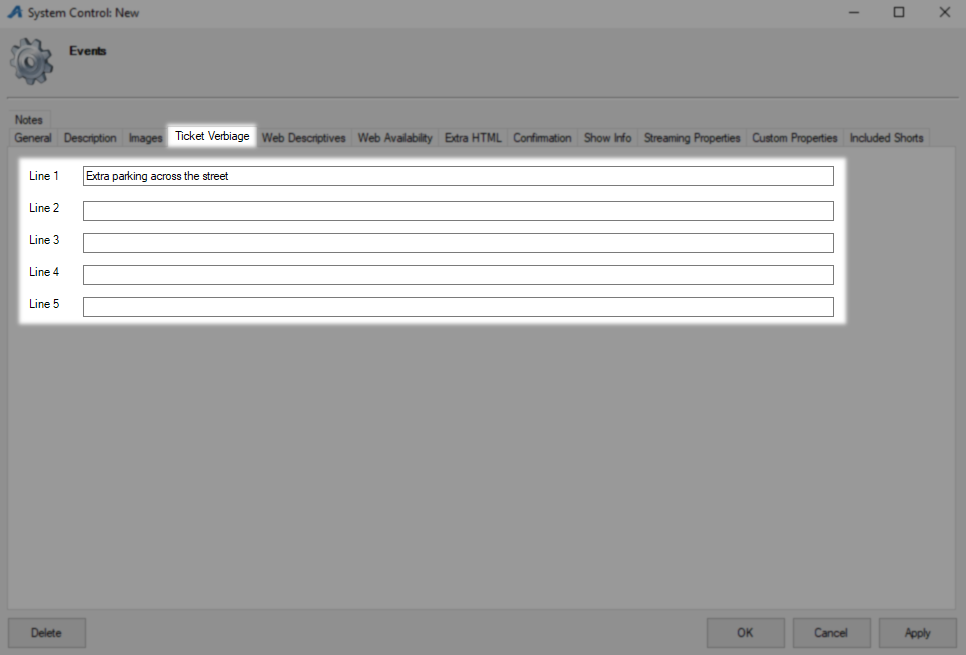
On the Ticket Verbiage tab, you have five fields that correspond to elements that can be added to your tickets. If you have something specific that needs to be printed on the ticket for this show this is where you put it.
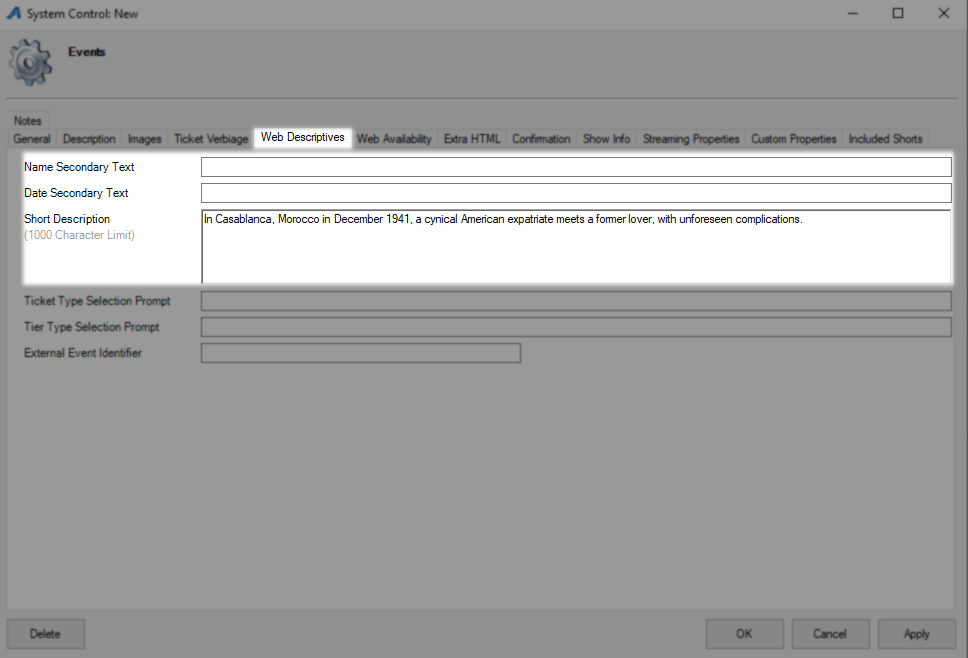
On the Web Descriptives tab, the first field is Name Secondary Text and will add text to the header that displays the name of your show. Date secondary Text will load additional text below the date for this show. Short Description will load in place of the full description where space is restricted.
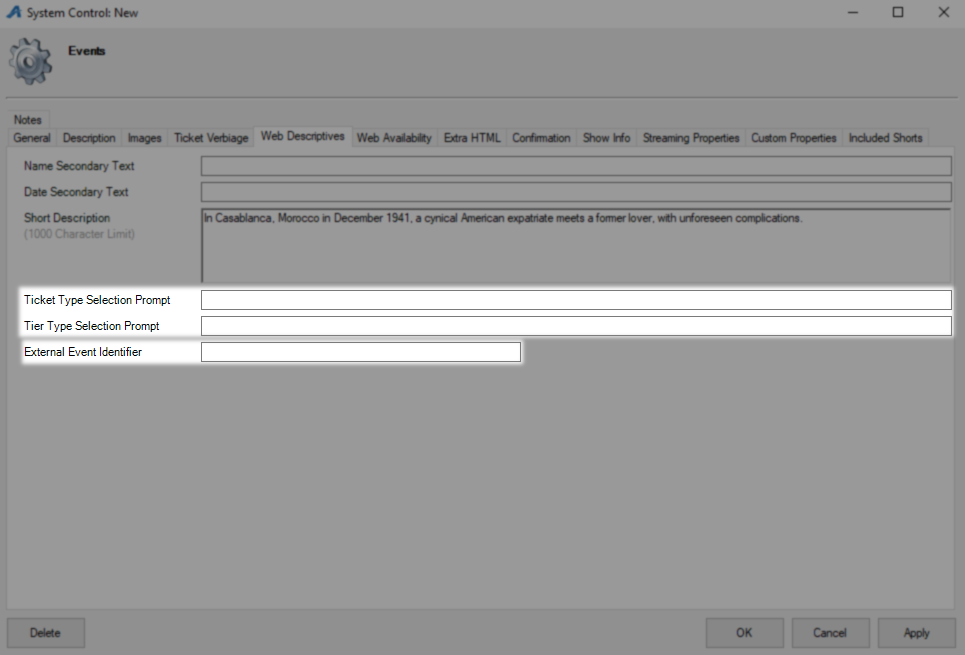
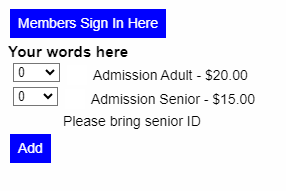
The Ticket Type Selection Prompt field allows you to change the wording in places where those words would have appeared. In this case, you can replace the words above your ticket selections as seen in the example below. Tier Type Selection Prompt does the same thing for that phrase and External Event Identifier will show on some reports.
The Web Availability Tab will display anything you put here as an information pop-out when your inventory reaches zero online.

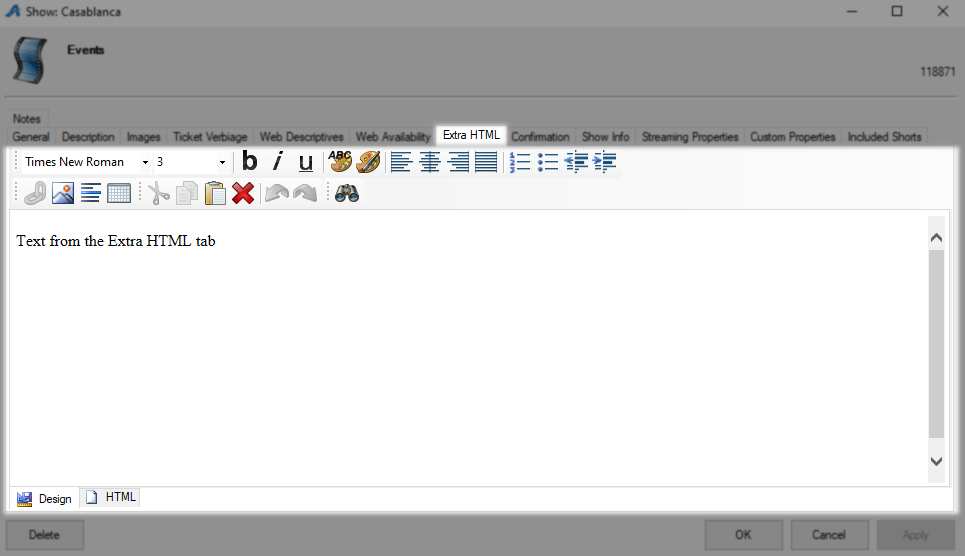
This Extra HTML tab holds extra information you would like shared with your customers, this will load below the main description on the full show page as seen in the example below.

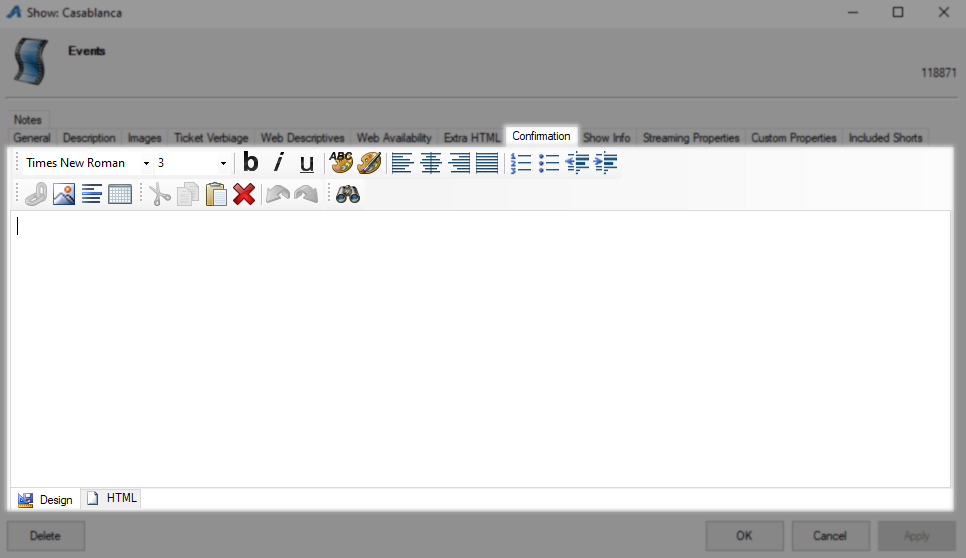
Anything you put on the Confirmation tab will be sent as part of the email customers get when checking out with the e-delivery sales method. This information loads at the top of that email making it a great place to get their attention.
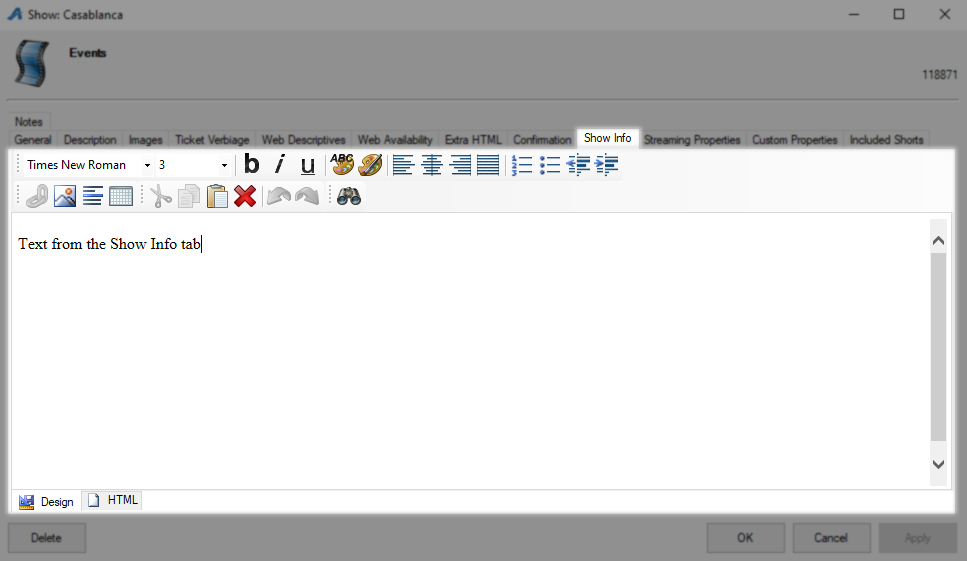
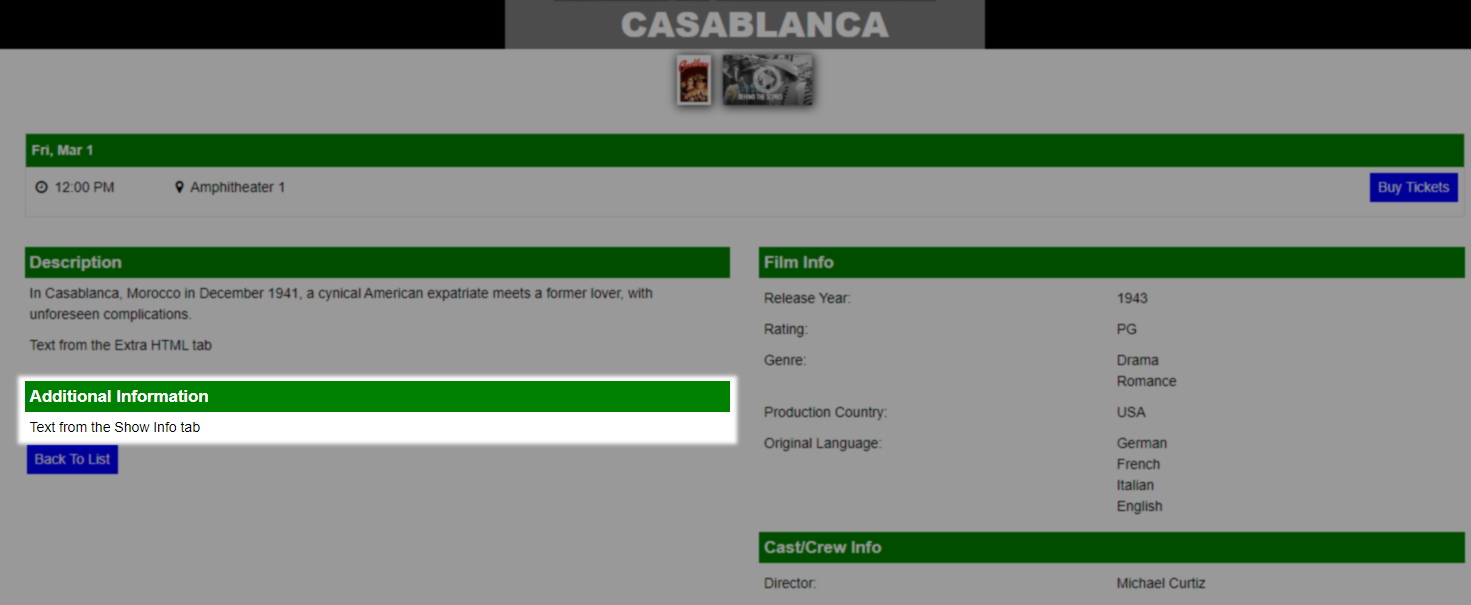
Information placed on the Show Info tab appears in an additional information area on the main show page as seen in the example below. This area is generally used for sponsorship information or a series poster.
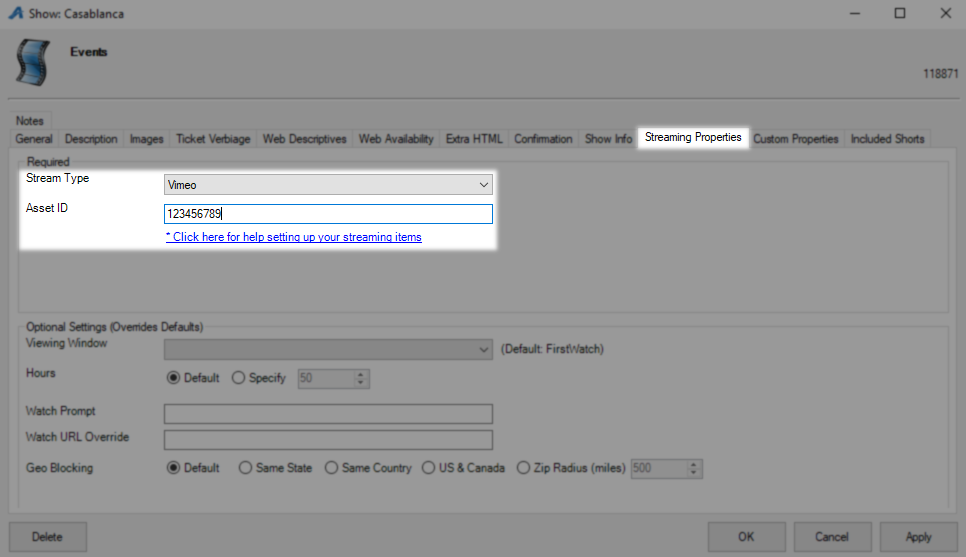
On the Streaming Properties tab if this is a streaming show select your method of upload and then follow the instructions from the link.
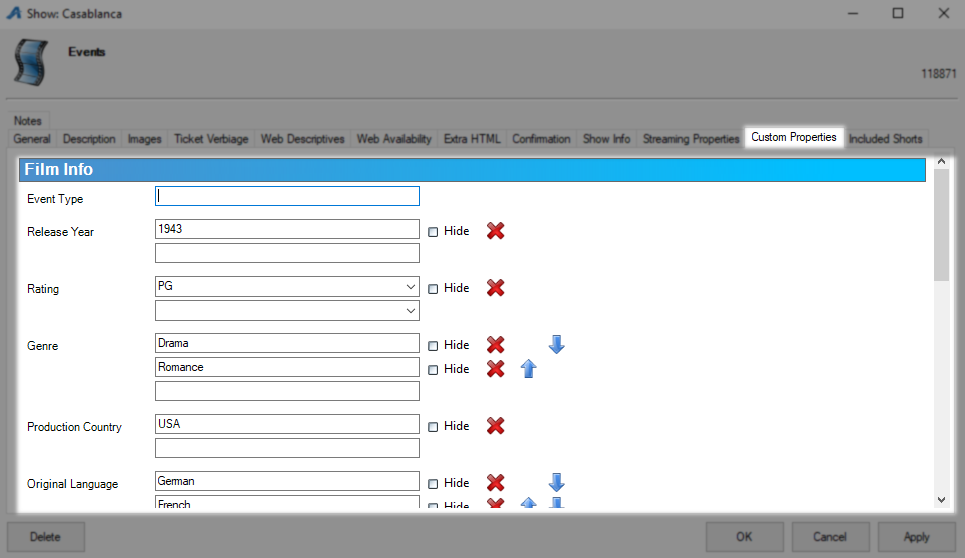
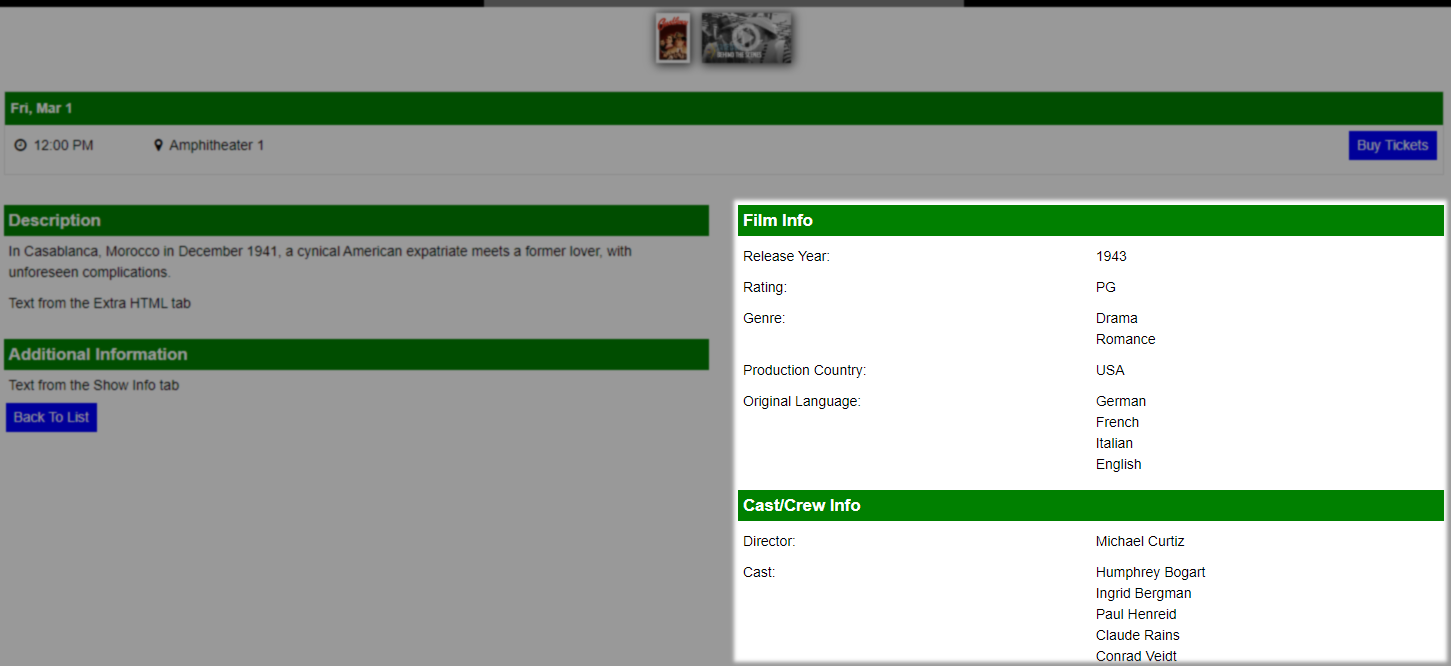
The Custom Properties tab holds information on film and cast but you have limitless access to add new groups and fields to this tab. Information placed here will load on the full show page as seen in the example below. Use These Instructions to add new custom properties.
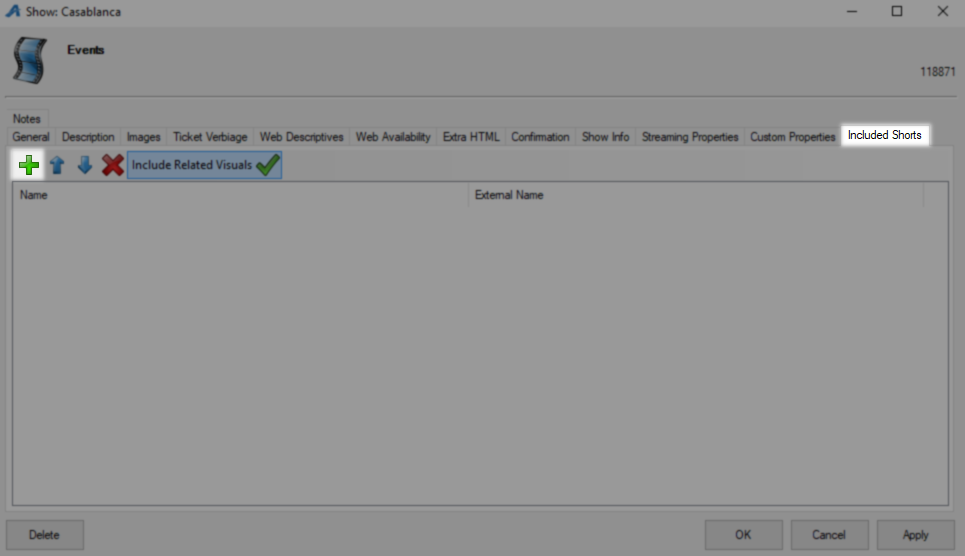
The Included Shorts tab is where you can tie in any number of shorts that will play as a collection or before/after this show. To add a short you must first build them and then use the Green Plus button to launch the Related Event Selector window.
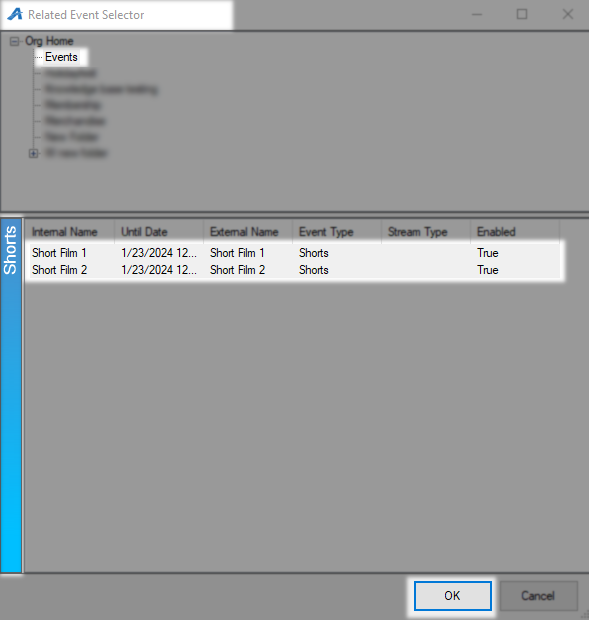
On the Related Event Selector window find the blue folder your shorts were built in and select it, this will load those shorts into the Shorts area below. Select as many shorts as you want to attach and hit OK to add them to this show.
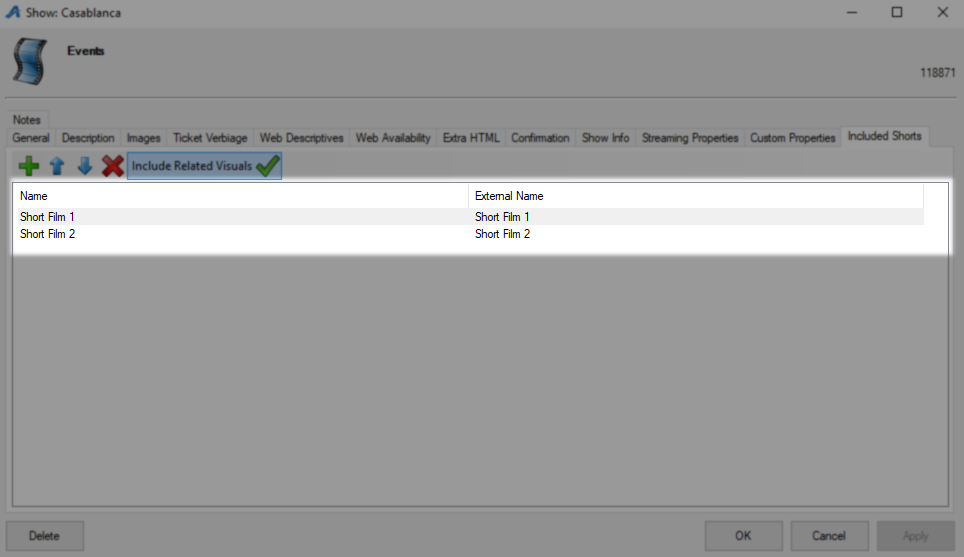
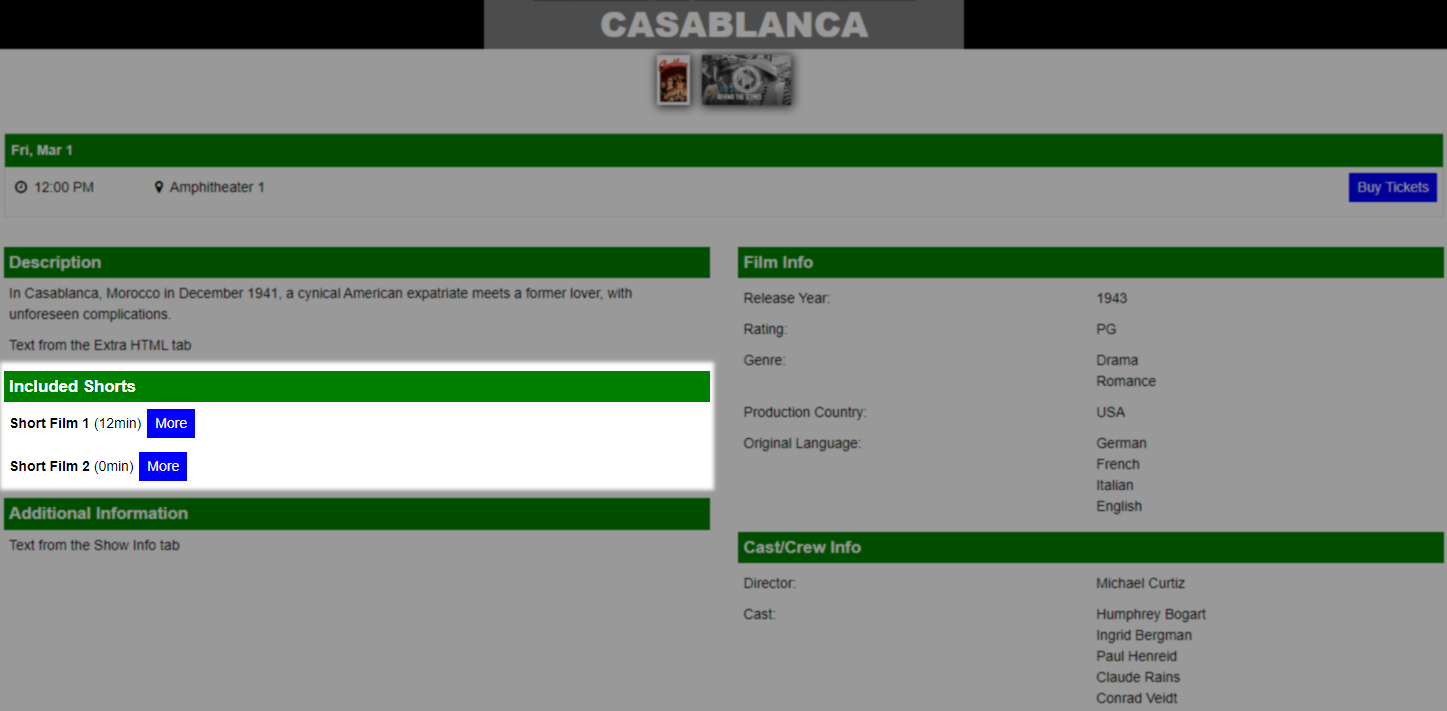
These shorts will now be on the shorts tab and will show up on the full show page with a button customers can click to learn more about this short as seen in the example below.
Click OK at the bottom right to close and save this show.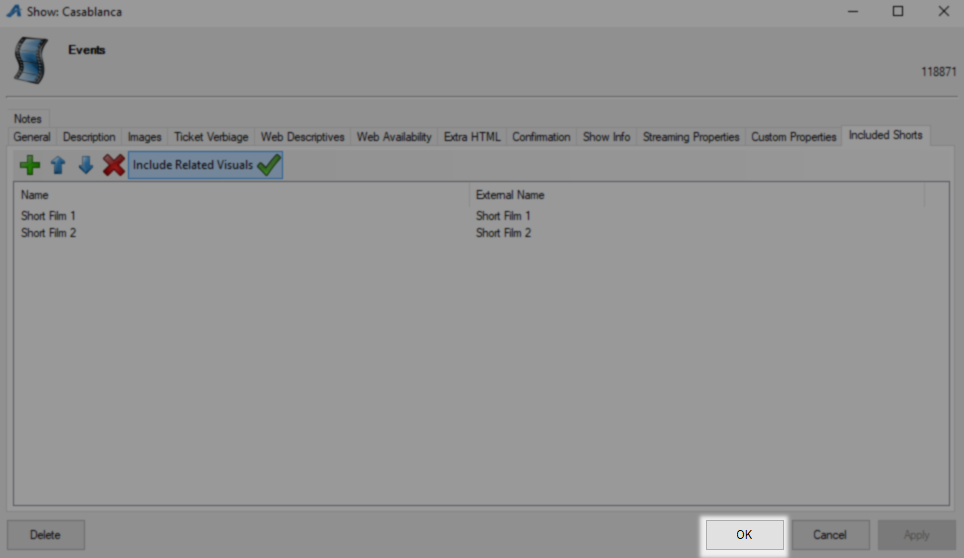
In the same Blue Folder under Show click the show you want to create a showing for then under that in the Showing area right click so you can select New.
Showing
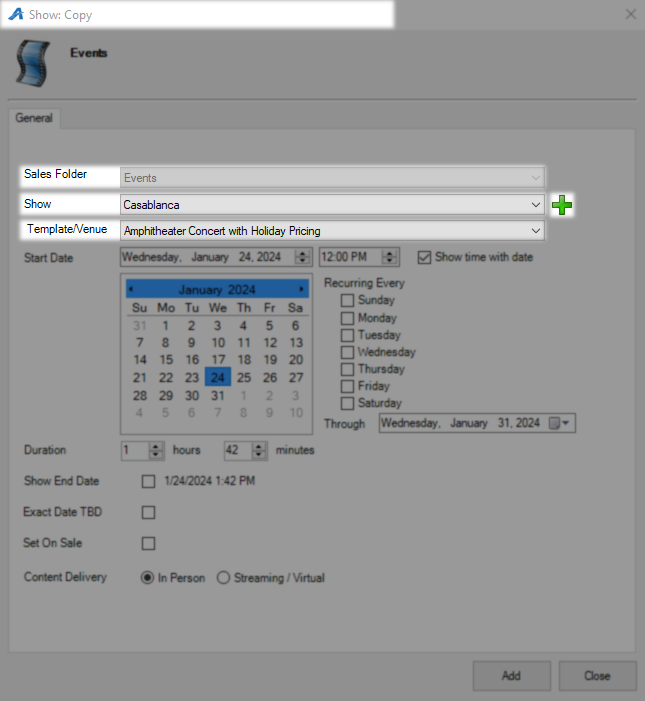
On the Show: Copy window the first field is Sales Folder which should be filled in already with the name of the blue folder this show is built in. Show is the first field you can change but should already have the name of the show you are working with. You can use the Green Plus and the directions above for creating a show if the option you need is not on the drop-down menu. In the Template/Venue drop-down menu select the template you created for use with this show.
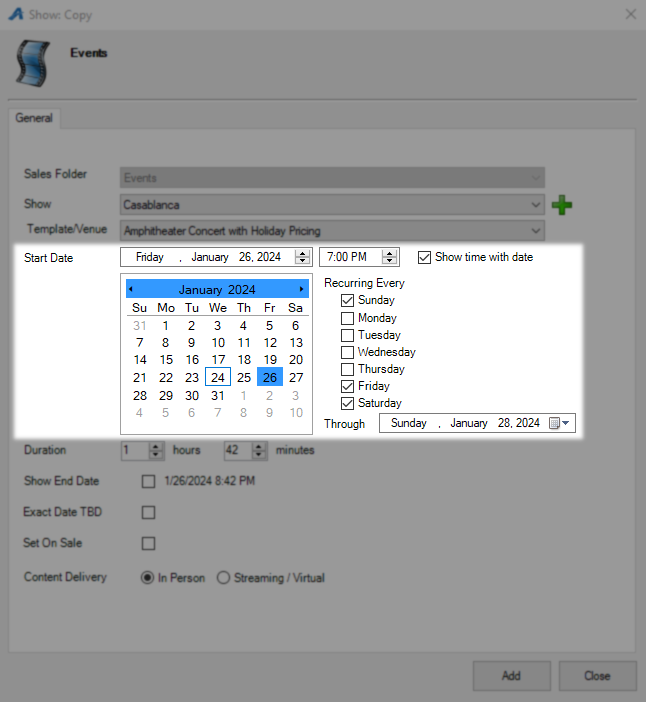
Next, use the Start Date field or Calendar to choose the first date for this show's runs, and to the right pick the Time this show will start. In the Reoccurring Every section pick the day or days of the week this show will be shown and then put your last date in the Through field. In the example below this show will begin on a Friday and run through Sunday at 7 pm. Check the Show Time with Date box to have the time displayed next to the date online.
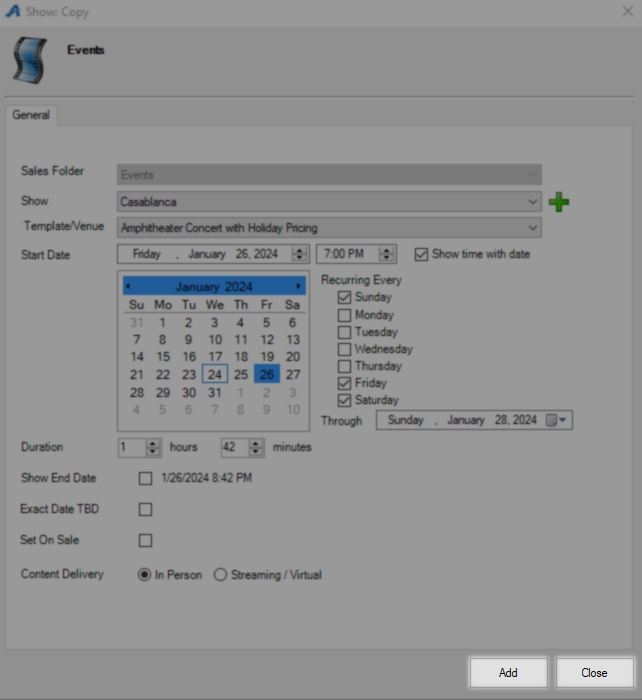
Duration will already contain the value from your show but can be adjusted here if you need to. Show End Date will display the end time of this show online and Exact Date TBD will let you put a show on sale even if you do not yet know what the date and time of that show will be. You can use the Set on Sale box to signal the system this show has everything it needs and should go on sale right away or leave this blank and activate your sales channels later. The Content Delivery toggle will only be visible if you have activated the streaming tab for this show by selecting a link type.

Click the Add button to use these settings and create your showings for this show then if you need additional showings adjust your date or times and click add again until you have all that you need. Use Close to close this window when you're done.
The Tier/Inventory will have been pulled in from your template but it is still possible to adjust that inventory by using These Instructions or you can add additional tiers using the instructions below.
In the same Blue Folder under Show click the showing you want to create a tier for then under that in the Tier/Inventory area right-click so you can select New Tier.
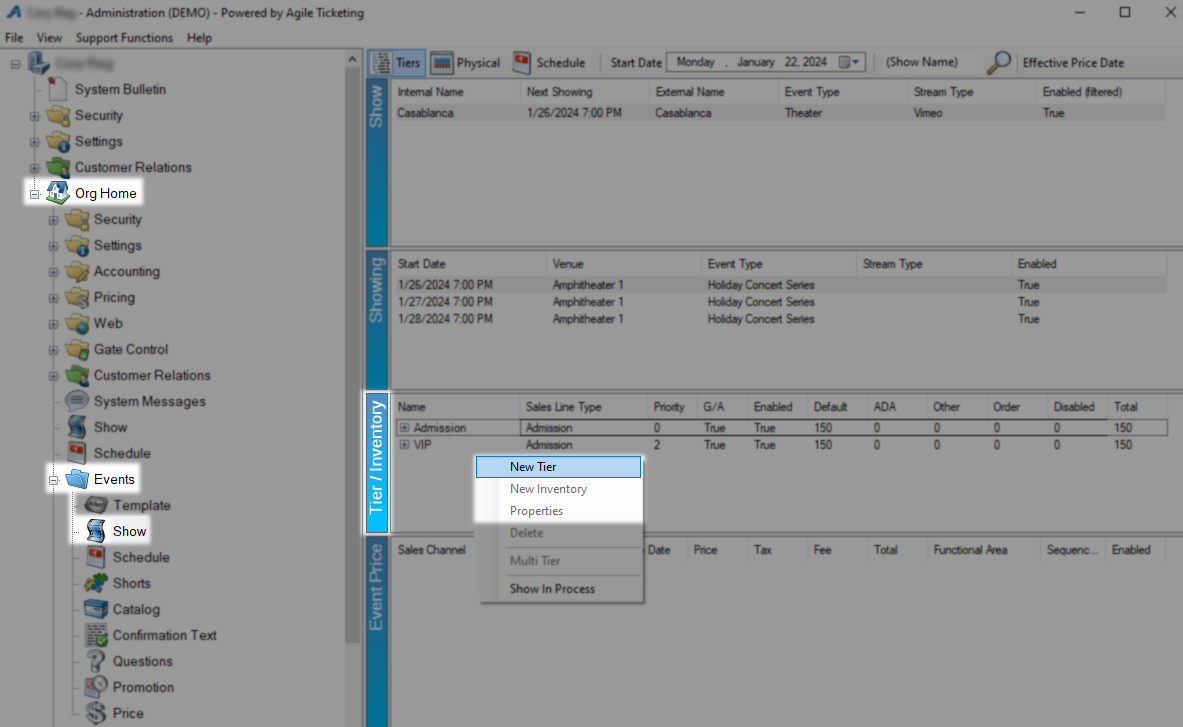
Tier/Inventory
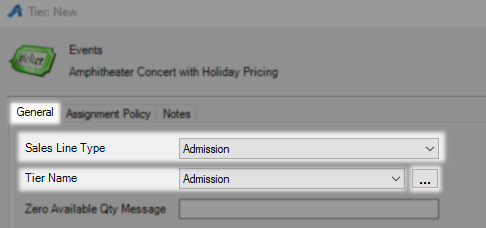
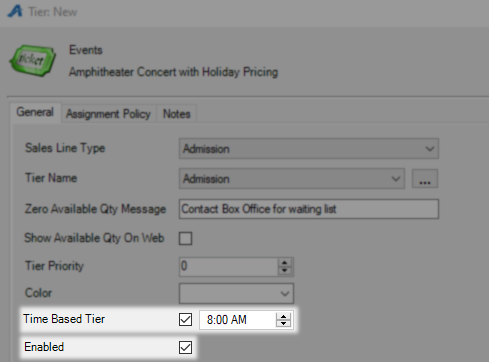
You will be started on the General tab and the first option to be addressed is Sales Line Type which defines the actual items being sold. For events and shows your default will be Admission to denote ticket sales but you can add more Sales Line Types Here if you find that you need them. Tier Name can be anything you want but must be unique for this template and is customer facing so Admission is a common choice. New Tier Names can be added using the Ellipses.
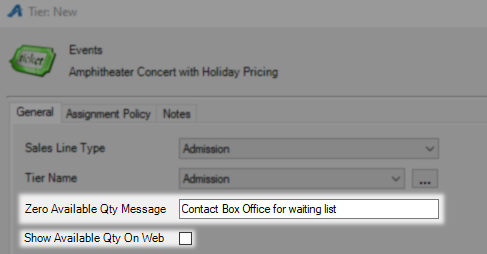
The next text field is Zero Available Qty Message and if you turned on the Display Message at Available Qty option in the previous section or sell out this is the message that will be shown to customers instead of "Sold Out". Below that is the Show Available Qty On Web check box which when checked will display this inventory online for customers to see.
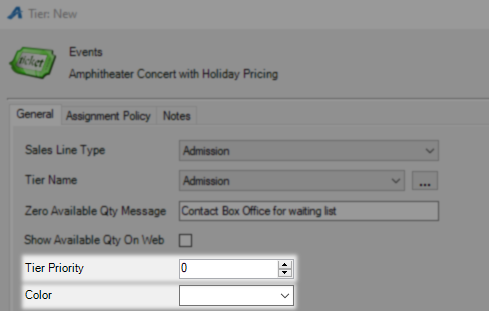
The Tier Priority determines where on a list this Tier will appear if this template will have multiple Tiers. A Tier Priority of 0 will have this Tier at the top of the list and the higher the number used the further down the list it will be pushed. Color here works just as in the previous section but can be segmented further if needed, leaving this blank will default to the setting of the higher level.
Next is Time Based Tier which is usually paired with the Event show type to create windows of entry with smaller inventory pools. This setting can be used to create tour groups of a more manageable size throughout the day. The Enabled box should be left checked or this Tier will not be available to sell.
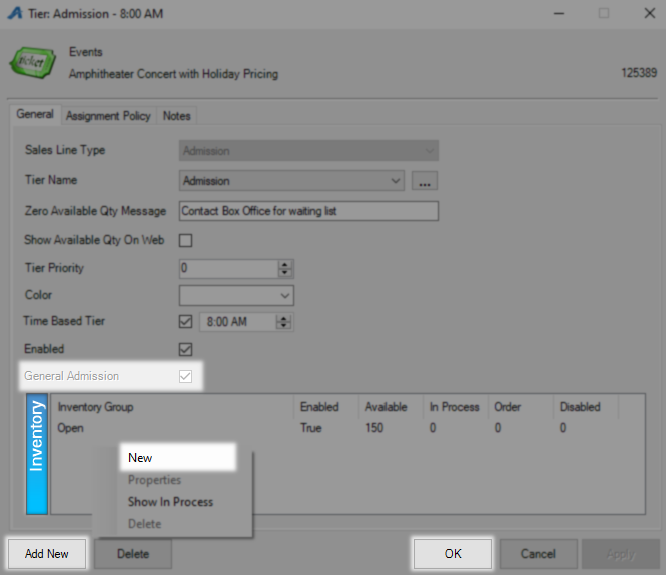
With all of that in place, it's time to decide if this Tier will be General Admission or Reserved Seating. If you do not check this box this Tier will only accept inventory information from a seating map and this setting can not be changed without rebuilding the Tier. The Initial Default Inventory is how much open inventory you want this Tier to start with. Click Apply to save all these changes and create your inventory pool.

General Admission will now be locked in and you can add more inventory by right-clicking in the Inventory field and selecting New. Clicking Add New will start this process over again for shows with more than one Tier and OK will save all settings and close so you can begin creating prices.
Just like the Tier/Inventory your prices will have been pulled in from the template but it is still possible to make changes and add pricing to existing showings by following the instructions below.
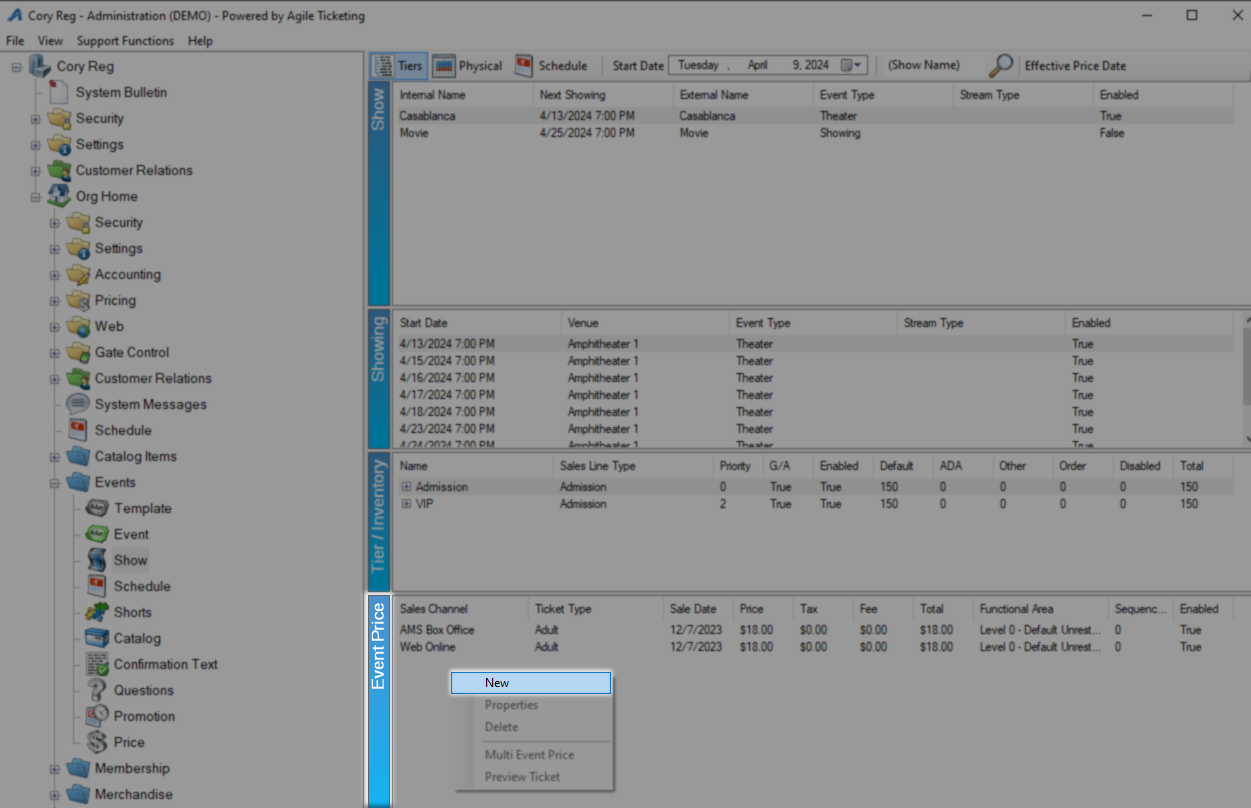
The final piece of a showing is the Event Price which will contain all of your ticket types and associated pricing. Select the Tier you want to create pricing for in the Tier/Inventory window and then in the Event price area right click and select New to begin.
Event Price
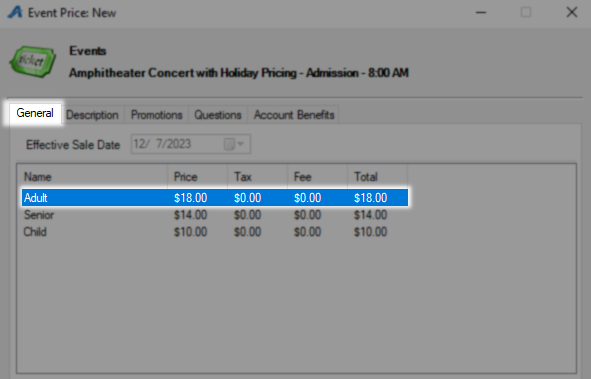
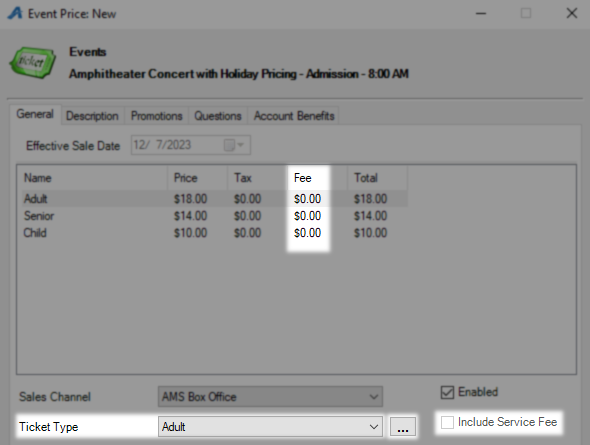
You will be started on the General tab and presented with a list of prices you previously created, if your price field is empty or missing one you need follow These Instructions to create new ones. Click the Price you want to select it.
The Sales Channel drop down may contain a number of options but they will break down into one of three categories. Your ticket will need to be built separately for each Sales Channel you want to have in use.
AMS or Agent Managed Sales - In-house method and will usually be sold at a PoS terminal.
Web - Any price that customers will access online.
Gate Control - This happens in-house but will be on a hand-held scanning device such as an iPhone.
Leave Enabled checked unless you want this price unavailable by default.

The Ticket Type is next and is what customers will see online or printed onto their tickets and you can use the Ellipses to add any not already on the list. The Include Service Fee box should only be active if you have a blanket service fee built and not if your Fee is built as part of the ticket price.
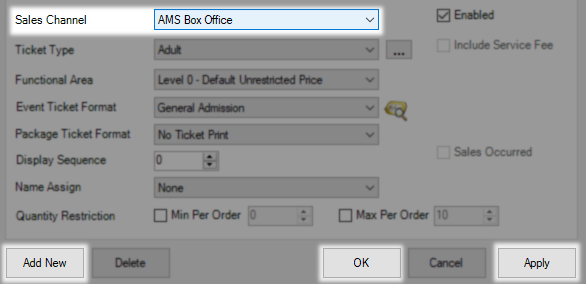
The Functional Area is used to restrict a price with a 0 being not restricted at all and a 4 being completely hidden. Restricted level 1-3 prices can be unhidden by benefits and promotion codes as where a level 4 will only be useable with assignment policy or behind-the-scenes measures

The next step is to assign a ticket format using the Event Ticket Format drop down and your starting options will be General Admission and Reserved Seating. The key difference between those two options is that Reserved Seating will have room for seating information and General Admission will not. Use the Ticket Preview button (Golden ticket and magnifying glass) to see all of the elements that will be present on this ticket when printed.

The Display Sequence here is again used to order your prices with a 0 being at the top of the list and higher numbers appearing further down. Best practice is to give a lower number to prices that will be hidden so that when your customer meets the requirement to unhide them they will appear at the top of the list and not the bottom where it can be missed. The Quantity Restriction can be used to set a Minimum and Maximum order amount which is great for group ticket discounts.

Start Date and End Date work with your sales channels to time exactly when your pricing is available. Using these fields you can define a window of time inside of your sales channel for this specific price to turn on and off. Leaving these fields disabled will default to your sales channel timing and these fields can be used independently if you only need to alter one time.

This process will have created a complete price so you are now ready to click Apply to save. To more quickly re-create this event price for another sales channel click the Add New button which will open these settings back up to changes. Swap your Sales Channel to one you have not created yet for this ticket type and click apply again. Use OK when you're done creating for this price to save and close.
You have now completed a showing price.
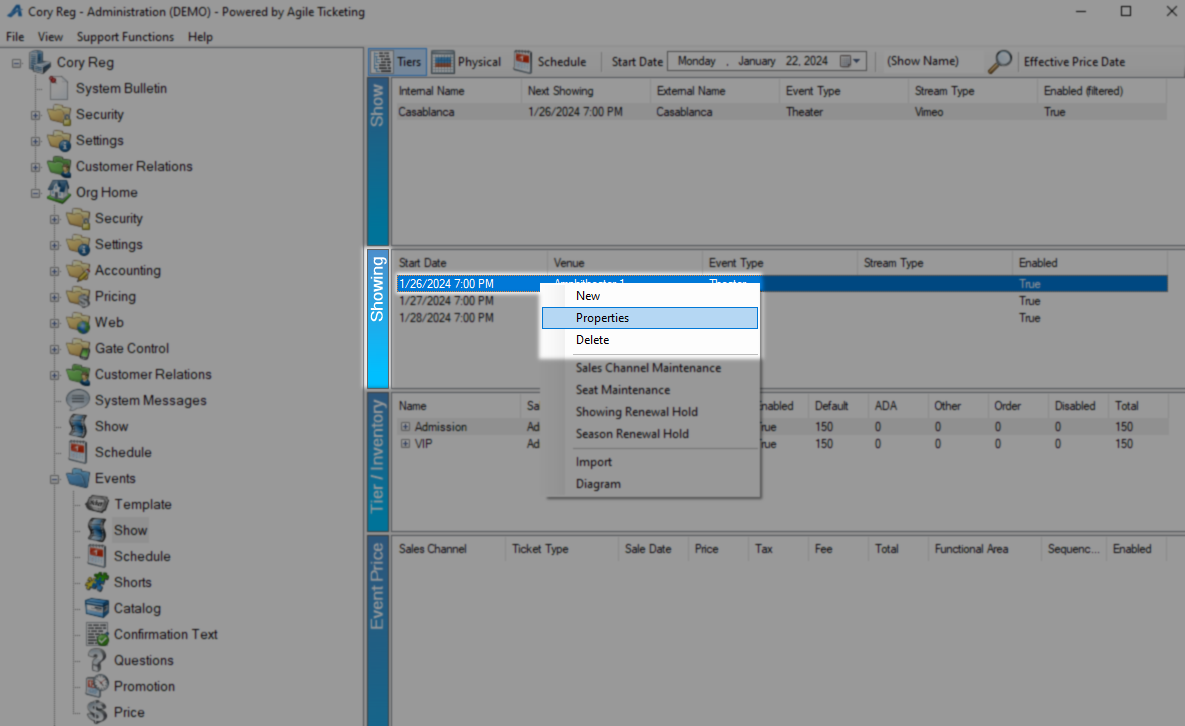
Your showings should now be on sale if you selected the Set on Sale box back during the showing creation step otherwise you still have one final step which is to set your sales channels. At the Event level locate the date and time you want to place on sale and right-click it so you can select Properties.
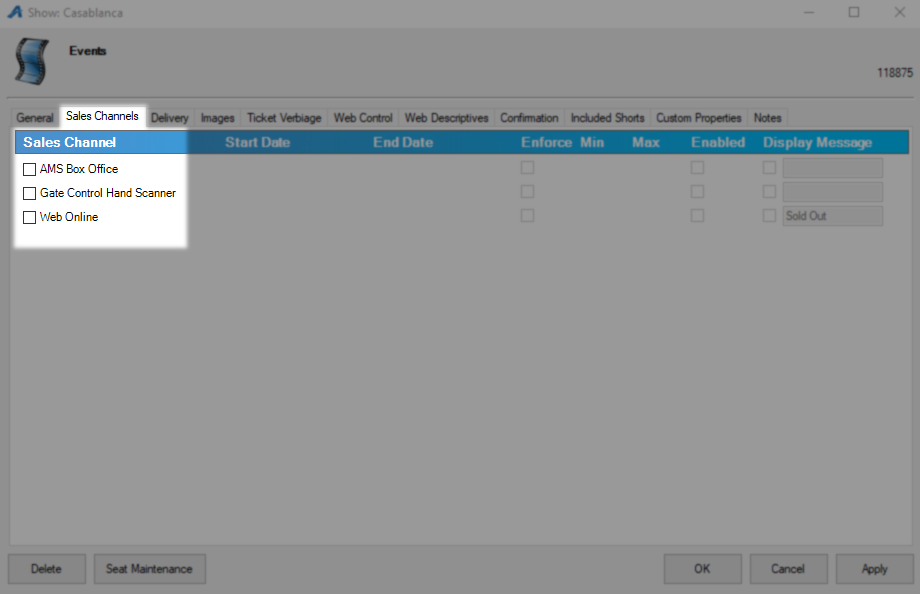
Navigate to the Sales Channel tab and put a check next to each one you would like to activate.
AMS Box Office - Prices available in your box office.
Gate Control Hand Scanner - Prices available to your iPhone scanning devices.
Web Online - Prices available to your online customers.
The Start Date column is when your ticket will go on sale and the default is today but you can set it for any specific date you would like past or future. End Date will be handled by the system according to rules set under Buyer Type in your Pricing folder but can be adjusted by hand also.
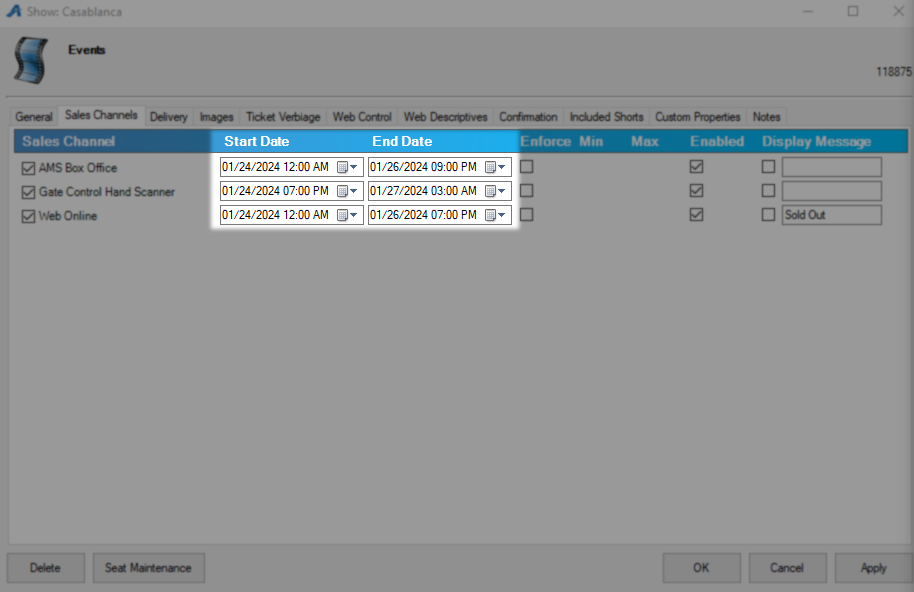
Leave the Enabled column checked unless you are turning this price off after sales have occurred. Check the Display Message box if you want to force the message in that field to display in place of a buy tickets button on this showing.
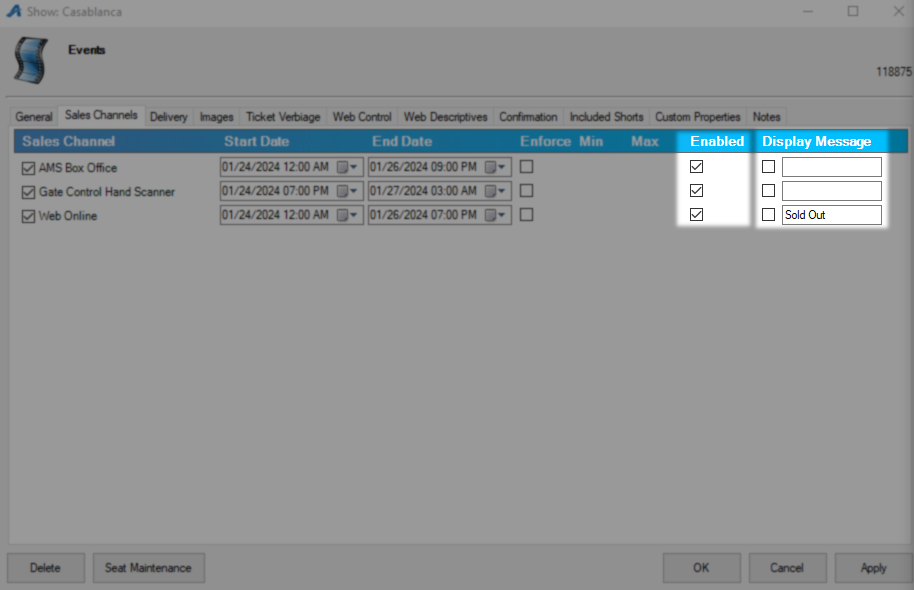
Click OK to save and close, your showing will appear online and in your box office soon.
Advanced Show Settings: Renewals
A show Renewal allows you to offer returning customers the same seats or tickets they had during the previous year or event. While parts of this process can be completed in the web portal it is not possible to go start to finish there at this time.
Begin by making sure your new show is built to resemble the previous event, using the same template and venue is advised for reserved seating shows but is less important for general admission. Right-click and select properties or double-click the showing customers will renew into.

In the Renews From section, click the magnifying glass to find the previous event.

Choose the folder your show is built in, and if needed, adjust the date to before this show happened. Once your shows load in the bottom field, select the previous show and click OK.

You will now see that show listed in the Renews From field.

The next step is to have the system place all of the previously sold seats or inventory on some kind of hold. Right-click the new show and select Event Renewal Hold.

Use the magnifying glass beside Event Data to Match to locate the event with previous sales.

Choose the folder your show is built in, and if needed, adjust the date to before this show happened. Once your shows load in the bottom field, select the previous showing and click OK.

Using the Inventory Group to Set drop-down, pick the type of hold you want to place all of these seats under. Best practice here is to use a hold type just for renewals but any hold type will suffice. Click Apply to have the system place all corresponding seats on hold and give you a message of success then OK to close this window.


You now need an entry point that will allow your customers to access this held inventory, as the system will only sell open-status inventory by default. In the Web folder expand the group for your web online sales channel, then right-click and select New-Renewal-Event/Show.

Give this entry point a name and display group, if you check Include in navigation below these will be customer-facing.

At Event/Showing select the current one that customers will be buying tickets for. For Renewal Start and Renewal End put the length of time you are allowing customers to renew before you open this inventory to the public. Leave Enabled checked and click Apply to create this entry point.

You can now copy this link for the last step of the process, which is to alert customers and allow them to purchase.

Open Emails and Letters from the green Customer Relations folder then right-click and select New. Using the Query Data Set drop-down to find Event - Renewal/Different Status.


When the Data Set tab opens, click Set Parameters. Do not check the Renewed / Purchased Current Events Yet, activating this will have the system contact only people who have completed the renewal process. Use the tab for Previous Event and Current Event to select those from your folder list, then click OK.


Use as many email features as you would like and include the link for the renewal entry point.

Here is what that looks like when the customer receives it and what the renewal page will look like once they click the link.
Creating a Showing in Web Portal
Shows in the Web Portal are broken into Show and Showing. The Showing is where you will use your template to create inventory and pricing.
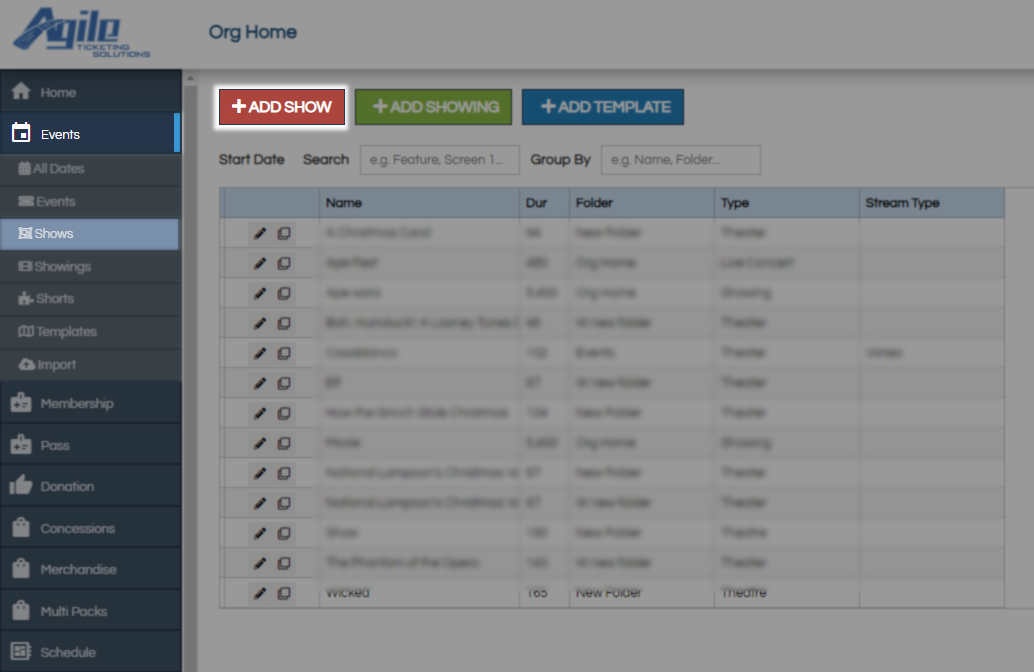
Begin by Logging In to the Web Portal and locate the Events section on the left menu which is where you will find Shows. Open up your shows and click the red Add Show button at the top to get started.
Show
The new show window will pop up and ask you to choose a folder via the Select Folder drop-down and hit Continue. You can follow These Instructions if you need to add a folder then reload the page to update this list.

Under Properties start at Name which is the customer-facing, name and will be used online and on tickets. If this show is for cinema use the Magnifying Glass to search the movie database and let it do the lifting for you. In the movie database, you will find films old and new as well as some live theatre, ask your rep to add this feature if it is not available.

After clicking the magnifying glass you will be on the Search Results window where you can check for movie or show information. In the Title field put the name you are looking for and click the Search button off to the right. Select your show from the list and all of the information that will be pulled in will load under it for you to preview. Scroll to the bottom and click OK to load this show and return to the previous page.


Duration is the total run time for this show which can be made customer-facing as well as how the system knows when to turn sales off.
Everything past this point is optional to put a show on sale
Short Description will load in place of the full description where space is restricted.
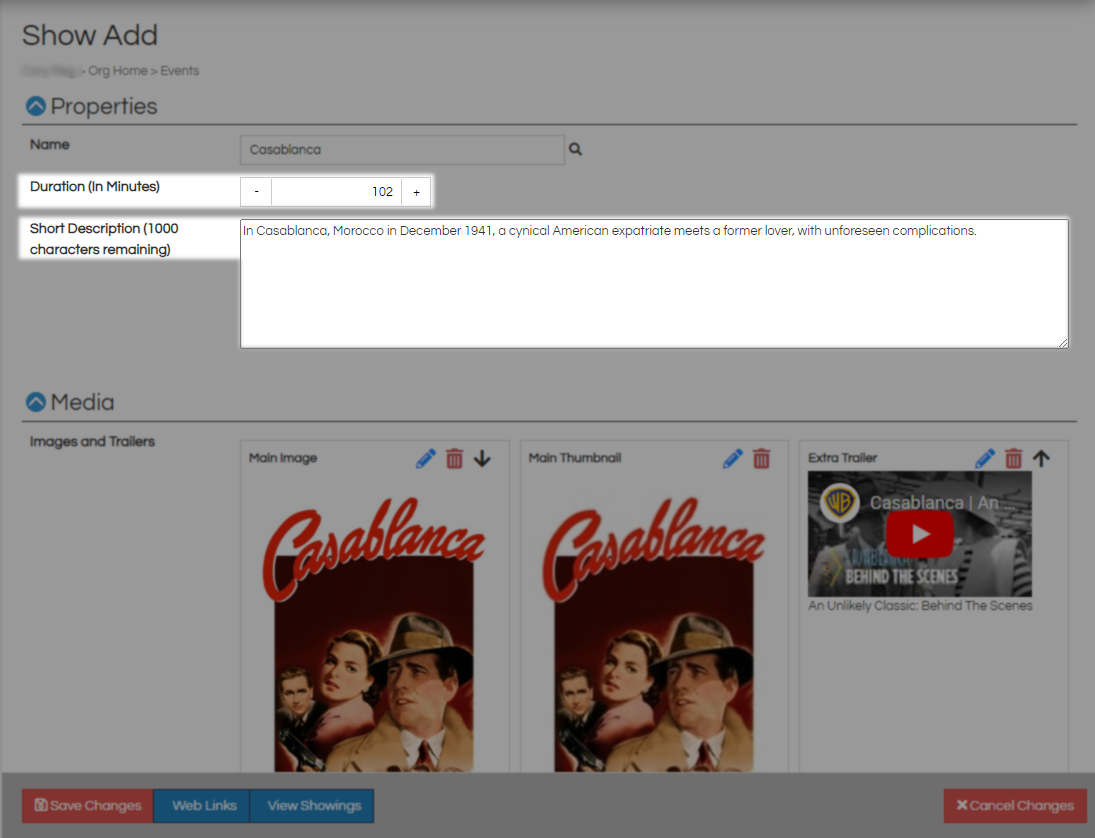
In the Media section, the Images and Trailers section will contain everything selected from your search or be empty and you will have to use the Add Media button to include them on this show. Above these media elements, you will find a blue pencil you can use to edit these, a red trash can you can use to delete them, or a black arrow that reorders how they will appear online.

On the Add Media window first, select the Type of media this is from the following options.
Image - This will let you upload an image from your computer and assign it a caption.
HTML Content - This will let you provide a box of HTML code and a caption.
Youtube - Accepts a YouTube link and caption.
Vimeo - Accepts a Vimeo link and caption.
Once your media is selected use the Upload Image and/or Accept buttons to move back to the previous screen, repeat for all desired media.

Streaming Properties is next and only applies to online streaming content, if you do need to proceed with this setup click the blue link for streaming instructions.
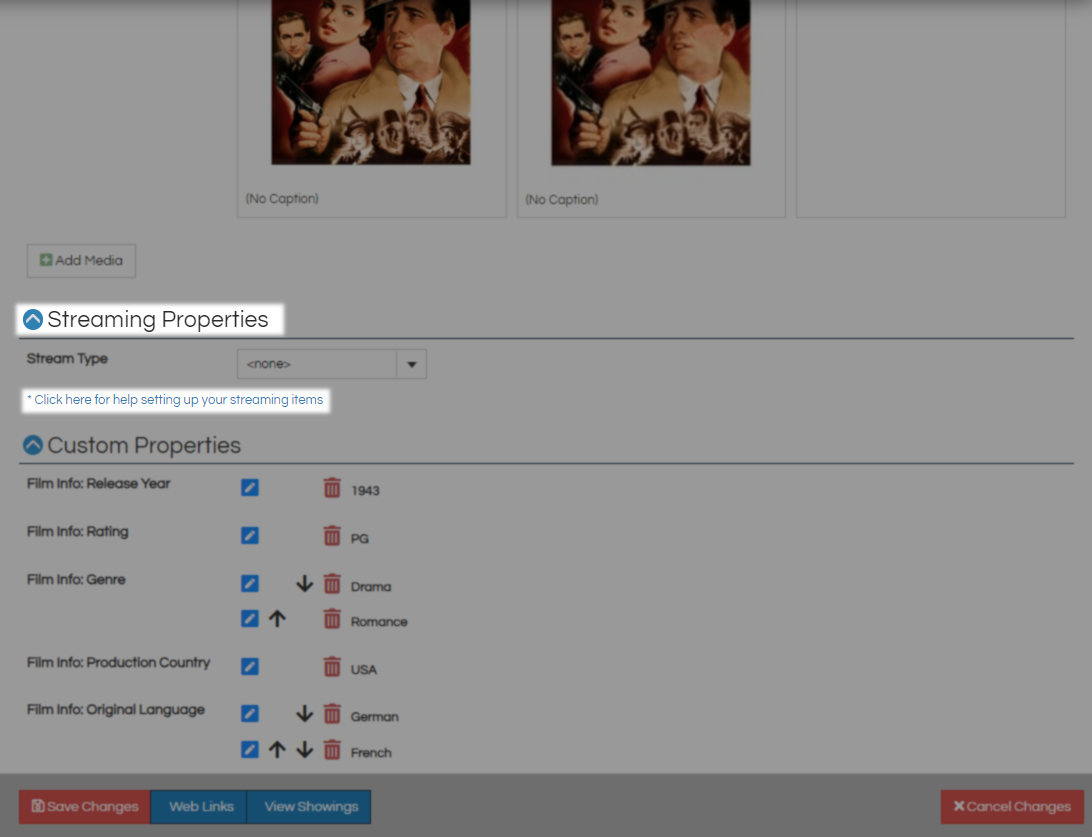
Custom Properties holds information on film and cast but you have limitless access to add new groups and fields to this tab. Information placed here will load on the full show page as seen in the example below. Use These Instructions to add new custom properties and the Add New Custom Property to add additional information to this screen. As above the blue pencil can be used to edit these while the red trash can lets you delete them and the black arrows are used to reorder them.
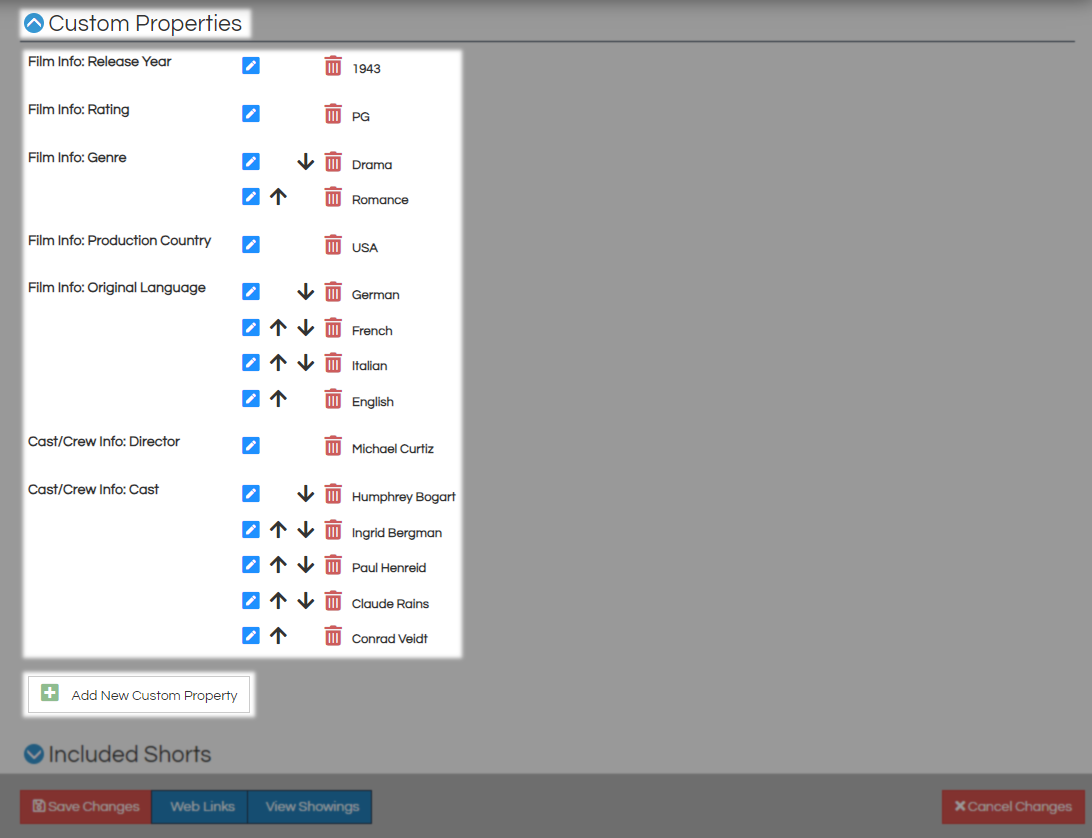

On the Add Custom Property window beside Type pick the field you would like to add an entry for and then in Value put that entry. The Hidden box is used to hide this entry from online show pages but it can still be used to filter at the entry point. Click Accept when you're done to save and return to the previous page.

The Included Shorts section is where you can tie in any number of shorts that will play as a collection or before/after this show. To add a short you must first build them and then use the Selected Content to Include drop-down menu to select and load them on the list below. Use the Include Media Elements check box to display shorts media on this show page.

Use the black arrows to reorder these shorts and the red trash can to remove them. See the example below for where you will find these on the show page.


Under Additional Information, the Sort Name is not customer-facing and will be used by the sales side of Agile and PoS system. Type is the broadest group this show can be put into for reporting and you can select from the menu or type in the field.
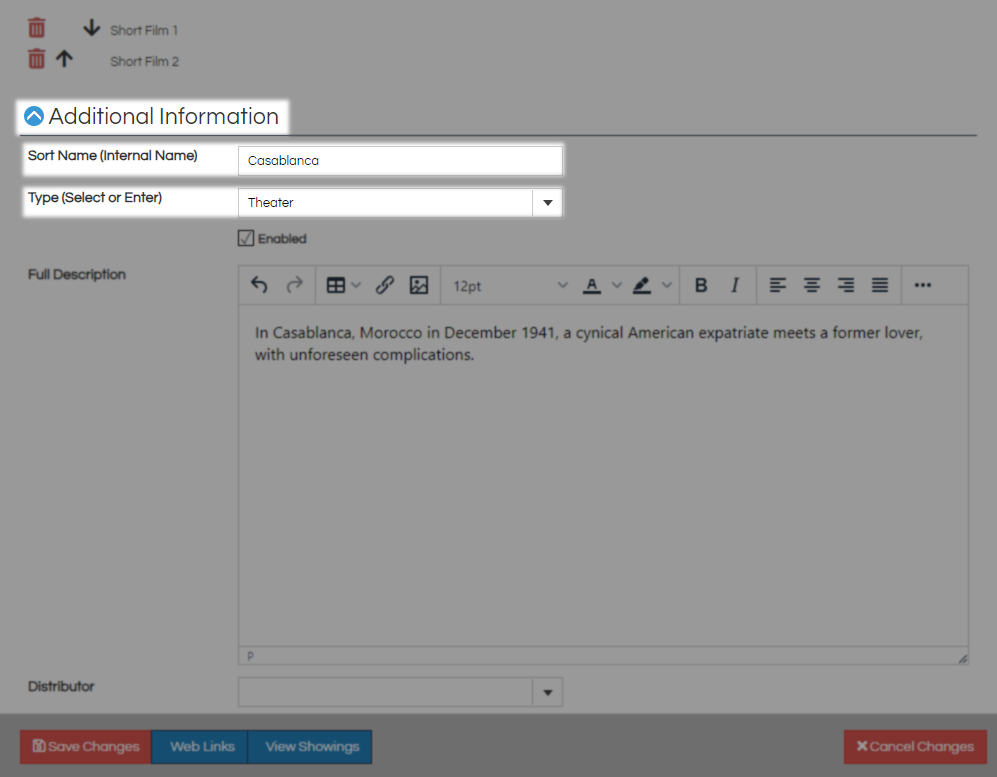
Uncheck Enabled only to deactivate this show and make it unavailable. Full Description can hold as much information about this show as you would like and will be displayed on the full show page online.
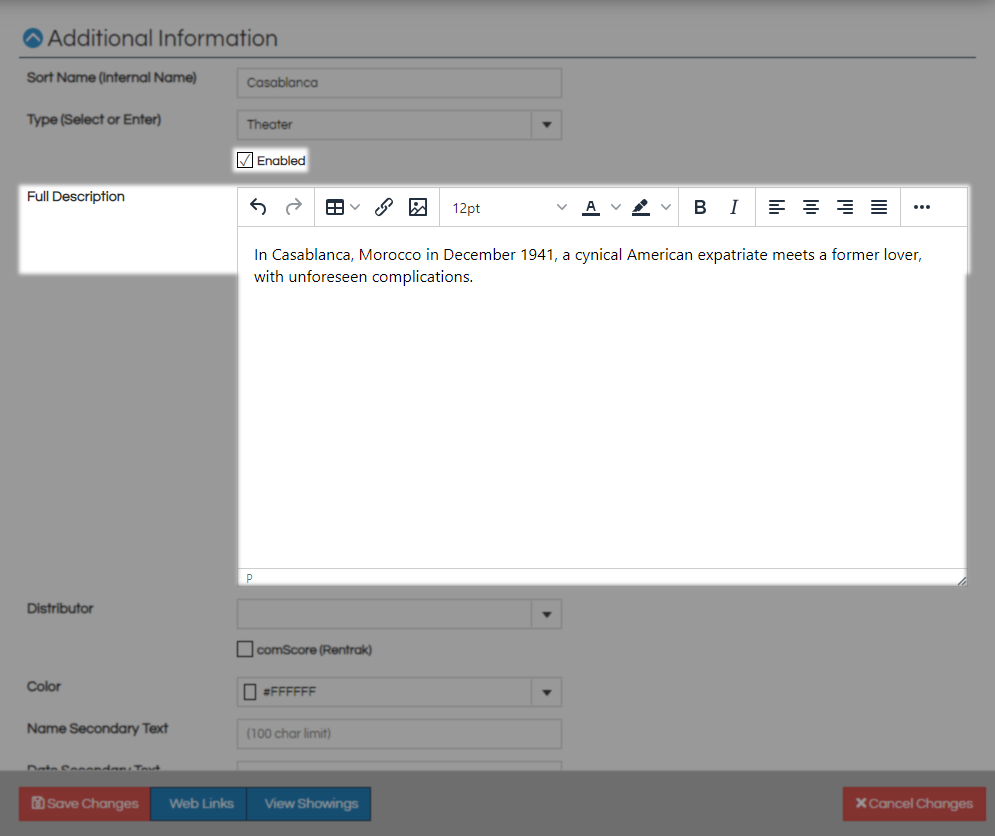
Distributor and the comScore check box allow for automated reporting of cinema events so activate both to have this film reported. Color is a selection that will apply to the buttons that appear on your PoS system and as a border online, if left blank the default color of your buttons will be white.
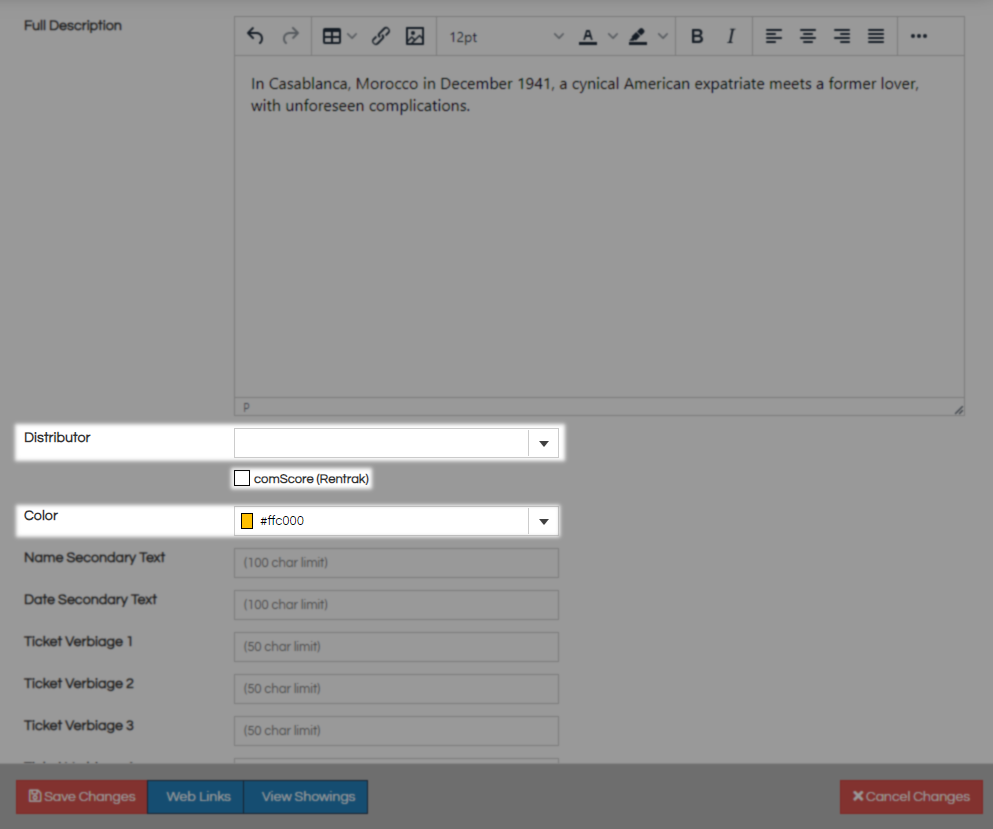

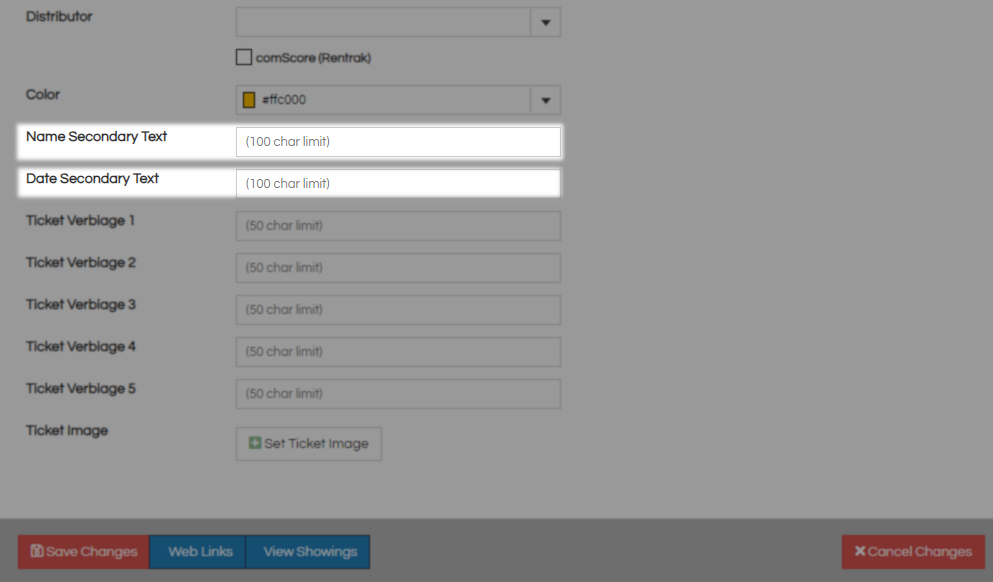
Name Secondary Text will add text to the header that displays the name of your show. Date secondary Text will load additional text below the date for this show.
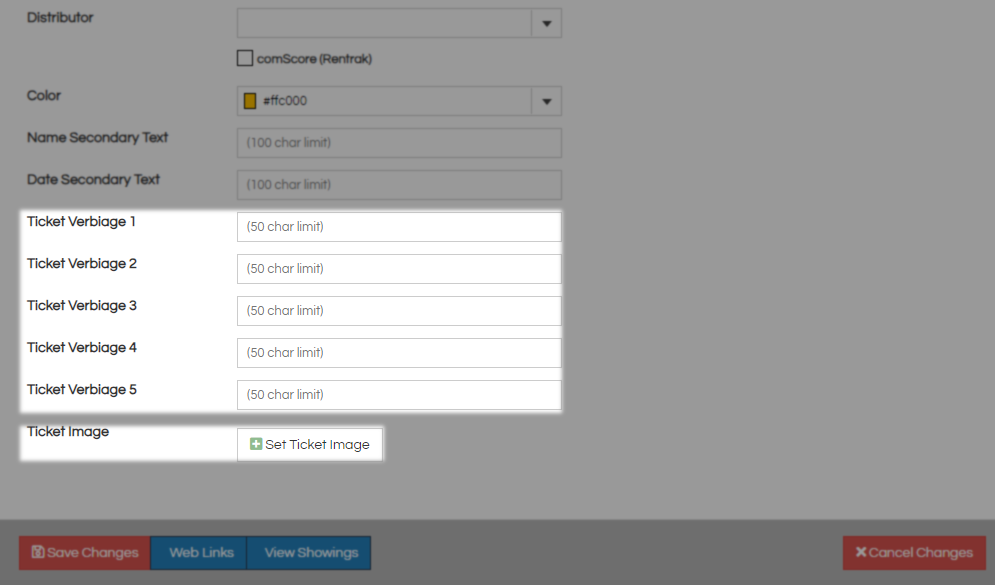
Ticket verbiage 1 - 5 and Ticket Image are all tied to elements that can be added to your tickets. If you have something specific that needs to be printed on the ticket for this show this is where you put it.
Click the red Save Changes button which will flash green and turn blue when the save is complete.
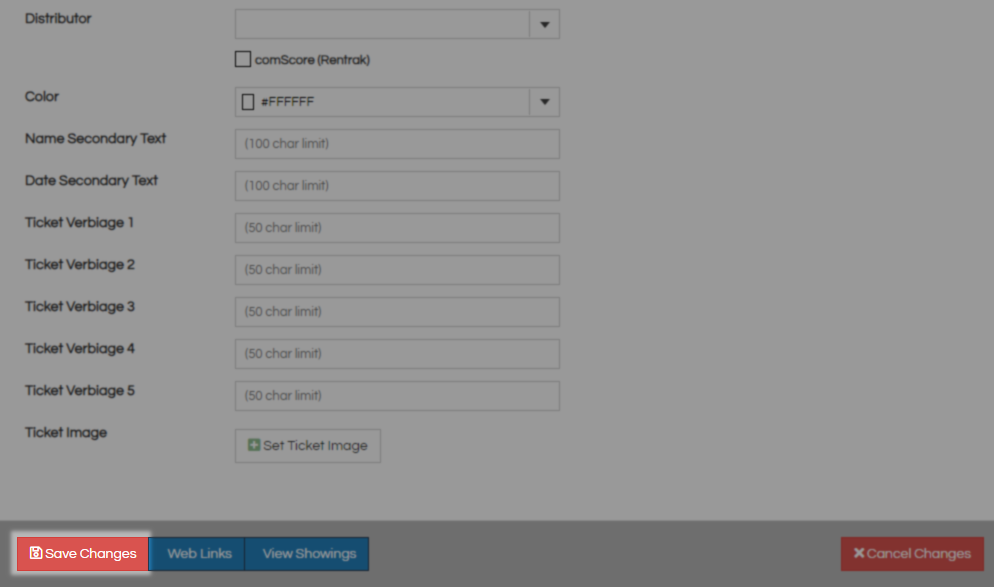
You may now exit this page or click the blue Add Showing button to move on to the next step.
To begin creating a showing, which is the specific date and time for a show, you will click on the Add Showing button. This button can be found at the top of the Shows and Showings pages as well as the bottom of any Specific Show page.
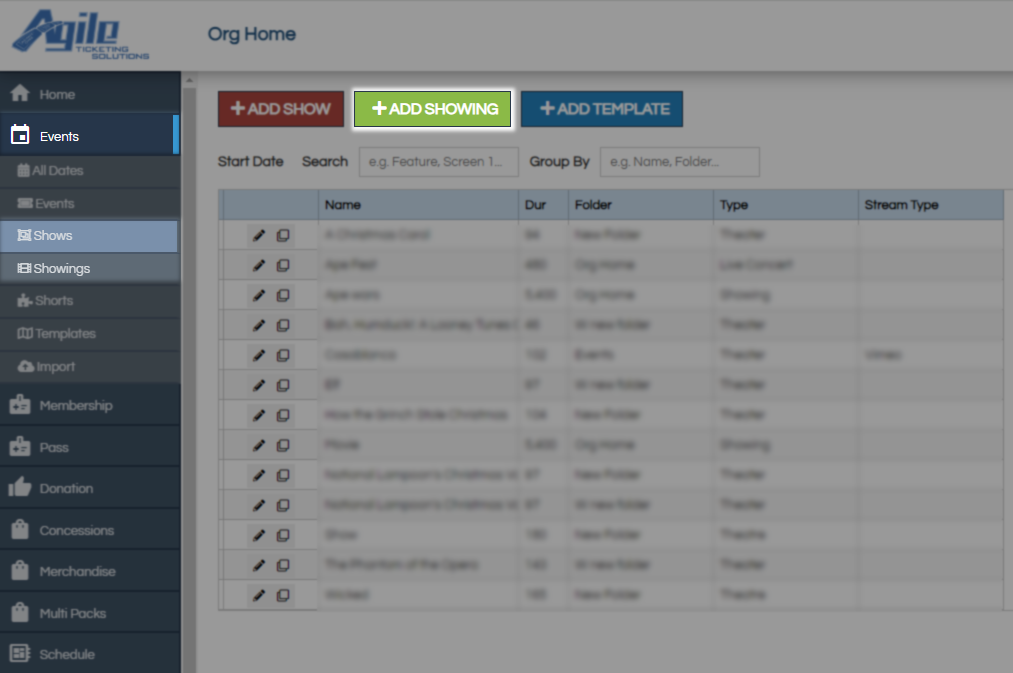
Showing
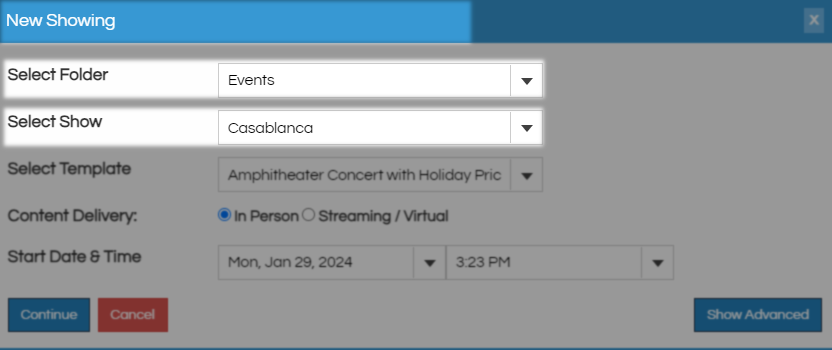
On the New Showing window you must pick a Folder, Show, and Template, if you got here from the Show page that field will not be present. At Select Folder pick the blue folder where the home show has been created, you will find the show you already created in Select Show if you picked correctly. Both of these fields will be filled in or have limited choices if you got here from a Show page.
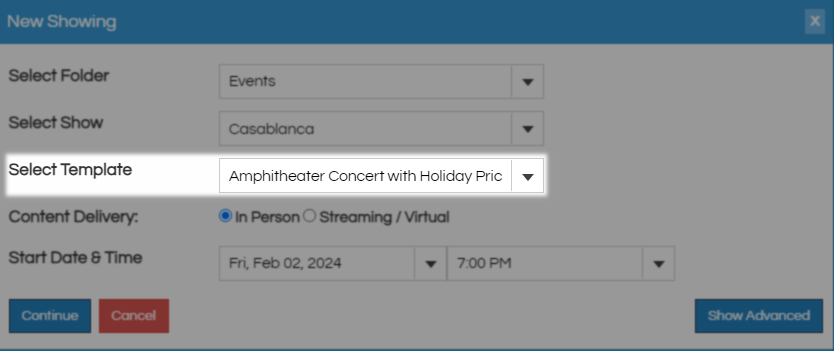
At Select Template choose the template that contains your inventory and pricing information.
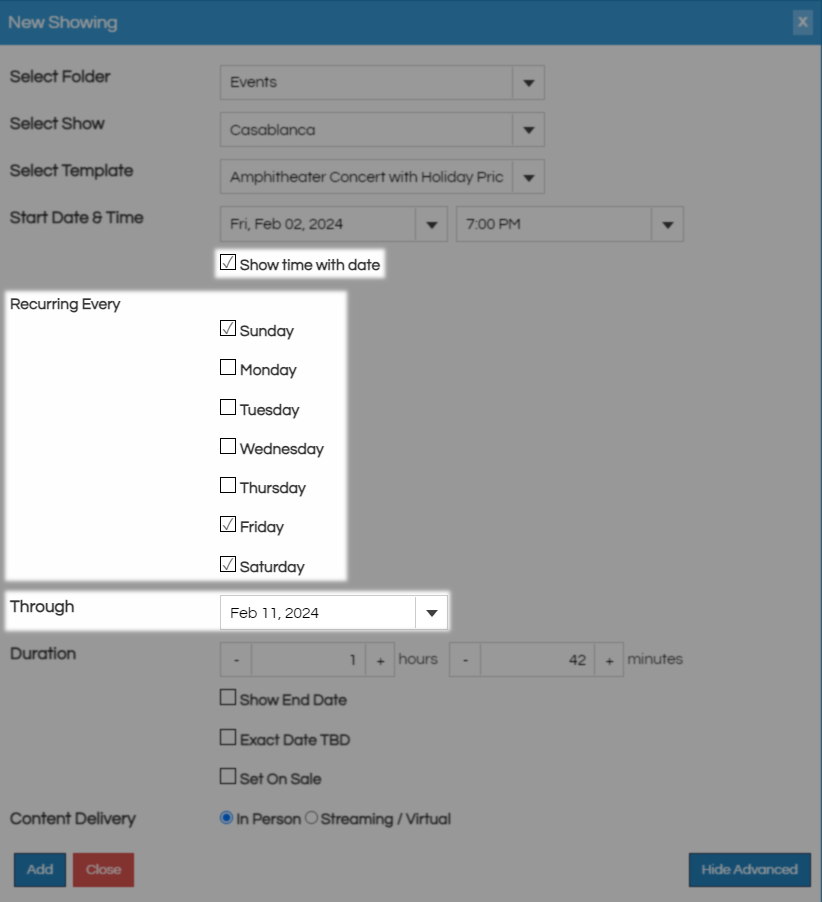
Start Date and Time is the exact date and time this showing will start, use the drop-down menus or click and type in these fields to make your selection. If you only need one showing click Continue to close and create this showing, for multiple showings click the Show Advanced button.
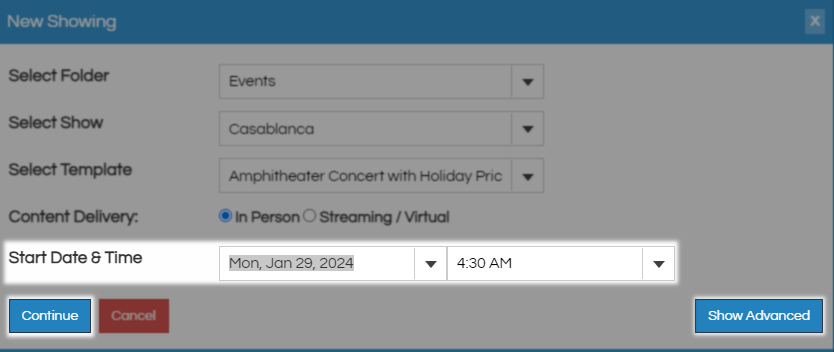
With Show Advanced open you now have access to the recurring options where you can build out several showings simultaneously. In the Reoccurring Every section pick the day or days of the week this show will be shown and then put your last date in the Through field. In the example below this show will begin on a Friday and run through Sunday at 7 pm. Check the Show Time with Date box to have the time displayed next to the date online.
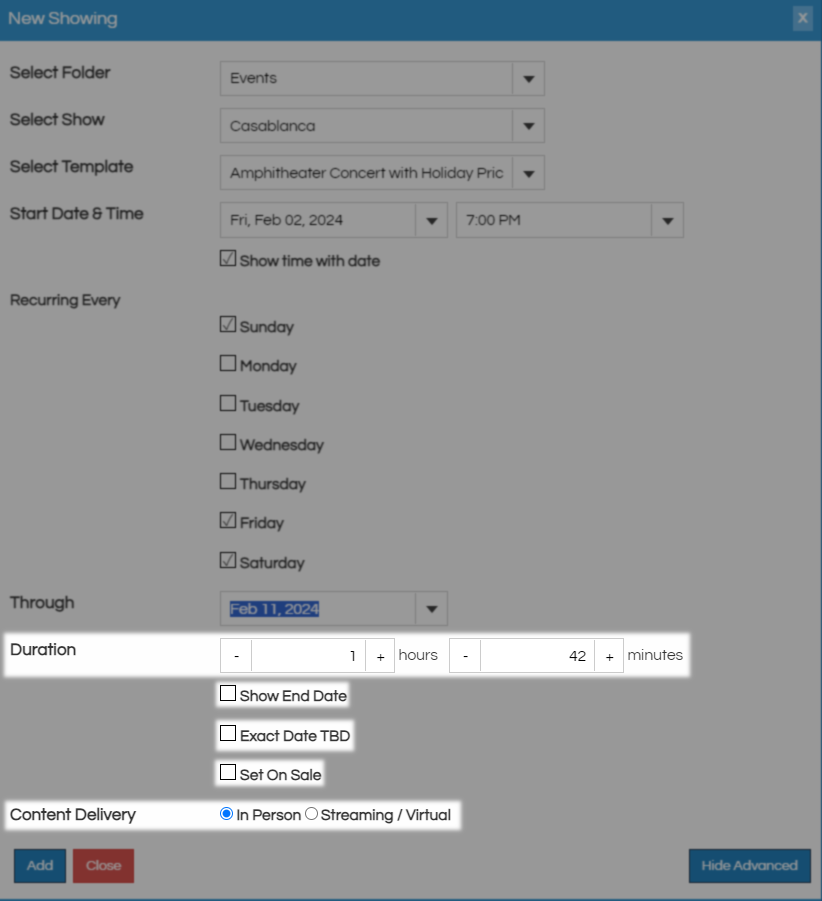
Duration will already contain the value from your show but can be adjusted here if you need to. Show End Date will display the end time of this show online and Exact Date TBD will let you put a show on sale even if you do not yet know what the date and time of that show will be. You can use the Set on Sale box to signal the system this show has everything it needs and should go on sale right away or leave this blank and activate your sales channels later. The Content Delivery toggle will only be visible if you have activated the streaming tab for this show by selecting a link type.
The Tier/Inventory will have been pulled in from your template but it is still possible to adjust that inventory by using These Instructions or you can add additional tiers using the instructions below.
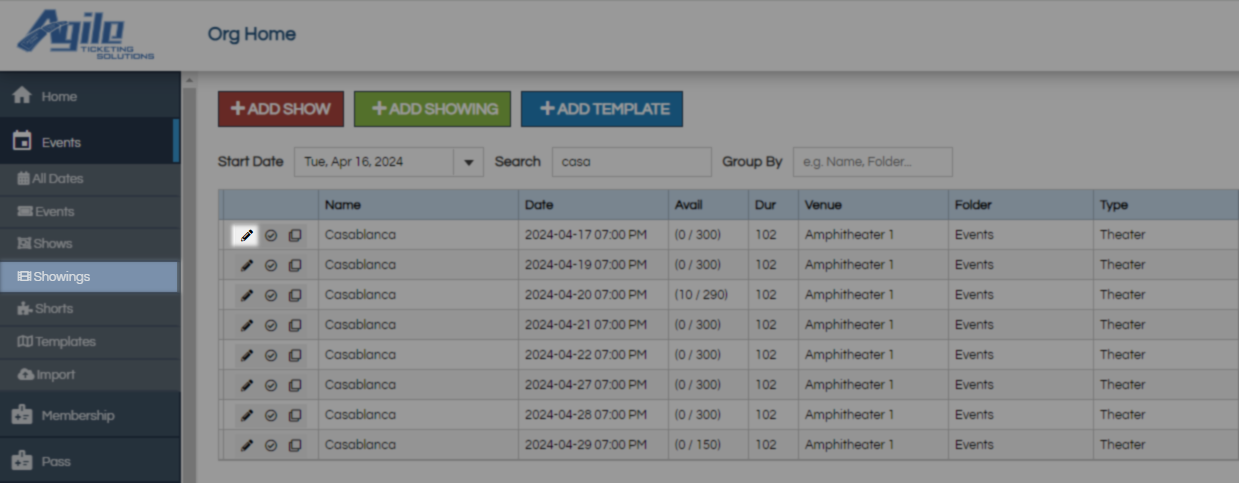
To add these access your show at the Showing level and click the edit pencil by the showing you are working with.
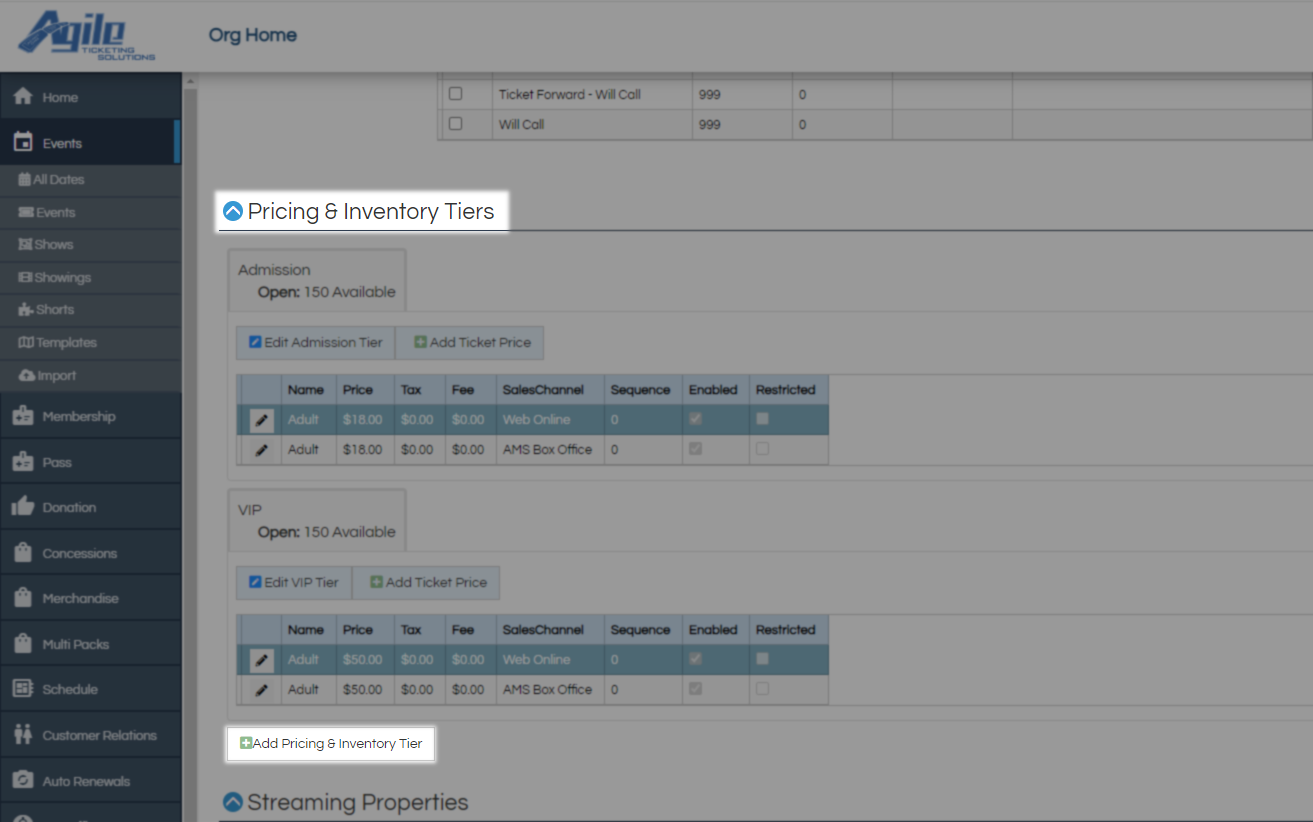
Once the showing loads scroll down to the Pricing and Inventory Tiers area and click Add Pricing and Inventory Tier to add a new one.
Tier/Inventory
You will be started on the General tab and the first option to be addressed is Type which defines the items being sold. For events and shows your default will be Admission to denote ticket sales but you can add more Sales Line Types Here if you find that you need them. Name can be anything you want but must be unique for this template and is customer-facing so Admission is a common choice. New Names can be added by typing in this field.
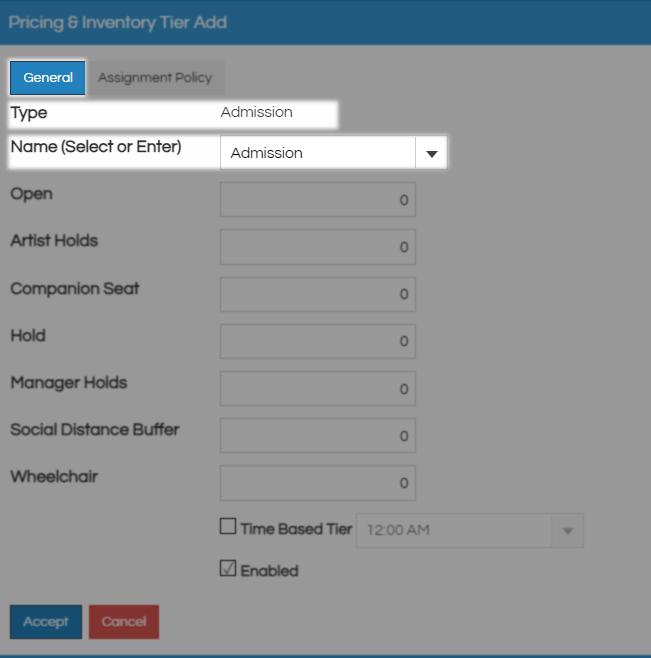
Next, decide how many tickets you want to sell to the general public and put that number in the Open field, this is the only inventory online orders will sell from. Artist Holds, Hold, and Manager Holds three ways to say you are not selling these tickets, the box office can sell these but they will not be available online. Wheelchair and Companion will only be available to customers who elect to see ADA seating. Social Distance Buffer isn't an inventory pool and is instead a way to automatically create a bubble of empty seats around a group of purchased tickets. With a 2 in that field, you would have 2 empty seats in every direction from the ones that are purchased.

Last is Time Based Tier which is usually paired with the Event show type to create windows of entry with smaller inventory pools. This setting can be used to create tour groups of a more manageable size throughout the day. The Enabled box should be left checked or this Tier will not be available to sell.
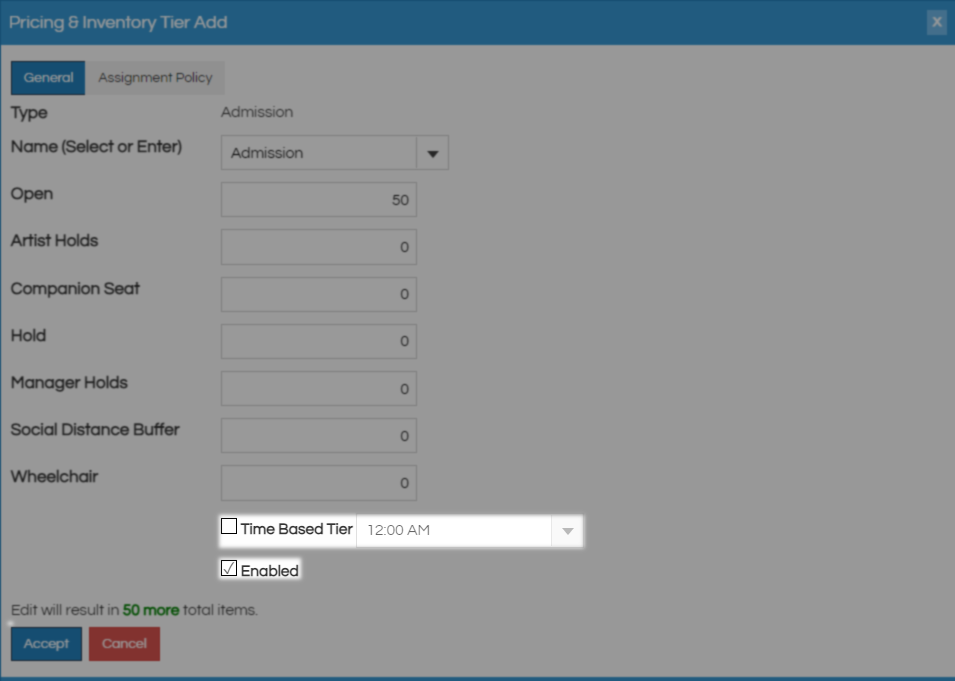
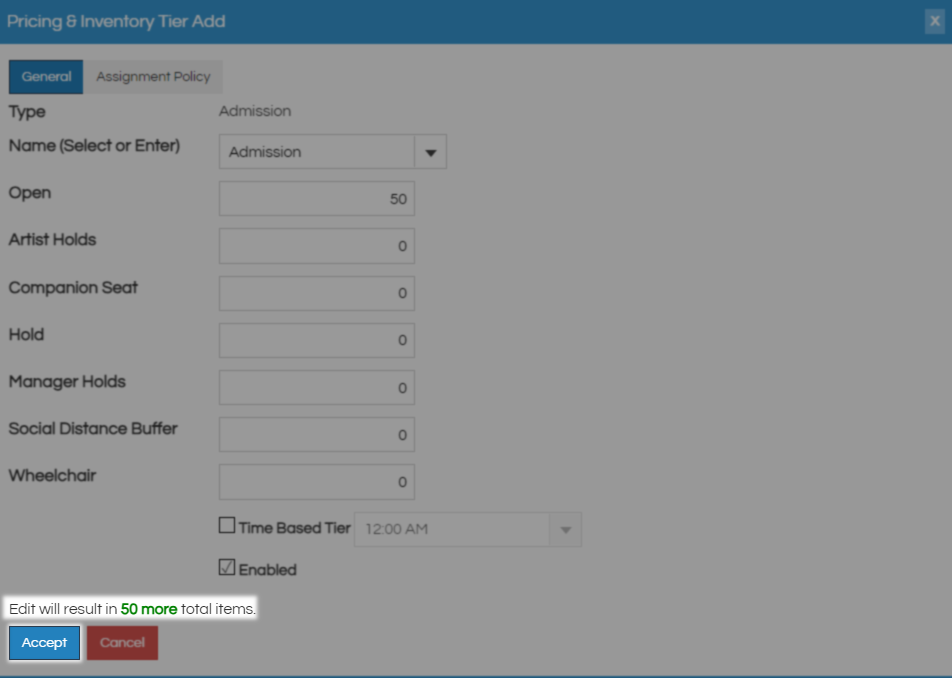
Before clicking Accept to save these changes you can double-check your work by looking at the summary of changes above that button.
Just like the Tier/Inventory your prices will have been pulled in from the template but it is still possible to make changes and add pricing to existing showings by following the instructions below.
The final piece of a showing is the Price which will also contain your ticket types. Select the Tier you want to create pricing for by clicking the edit pencil at the showing level.

Once the showing loads scroll down to the Pricing and Inventory Tiers area and click Add Ticket Price on the appropriate tier.

Pricing
You will be started on the General tab at Buyer Type which is also called the Sales Channel. The Buyer Type drop-down may contain many options but they will break down into one of three categories. Your ticket will need to be built separately for each Buyer Type you want to have in use.
AMS or Agent Managed Sales - In-house method and will usually be sold at a PoS terminal.
Web - Any price that customers will access online.
Gate Control - This happens in-house but will be on a hand-held scanning device such as an iPhone.
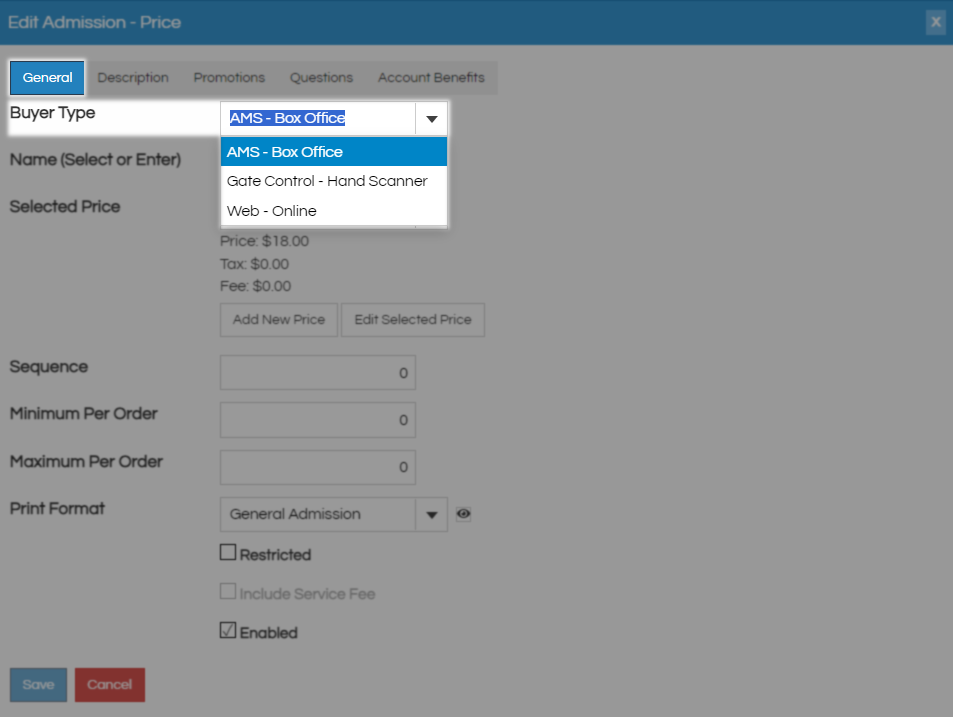
For Name either click and type or use the drop-down menu to select from previously used names. This is a customer-facing field and will print on tickets, best practice is for your Price and Name to be similar or the same. Selected Price presents a list of prices you previously created, if your selected price field is empty or missing one you need follow These Instructions to create new ones.

Sequence here is again used to order your prices with a 0 being at the top of the list and higher numbers appearing further down. Best practice is to give a lower number to prices that will be hidden so that when your customer meets the requirement to unhide them they will appear at the top of the list and not the bottom where it can be missed. Minimum Per Order and Maximum Per Order allow you to set the required amounts for ticket purchasing, this setting is great for group tickets which usually offer a lower price point for groups over a certain size.

Start Date and End Date work with your sales channels to time exactly when your pricing is available. Using these fields you can define a window of time inside of your sales channel for this specific price to turn on and off. Leaving these fields disabled will default to your sales channel timing and these fields can be used independently if you only need to alter one time.

The next step is to assign a ticket format using the Print Format drop down and your starting options will be General Admission and Reserved Seating. The key difference between those two options is that Reserved Seating will have room for seating information and General Admission will not. Use the Ticket Preview button (open eye) to see all of the elements that will be present on this ticket when printed.
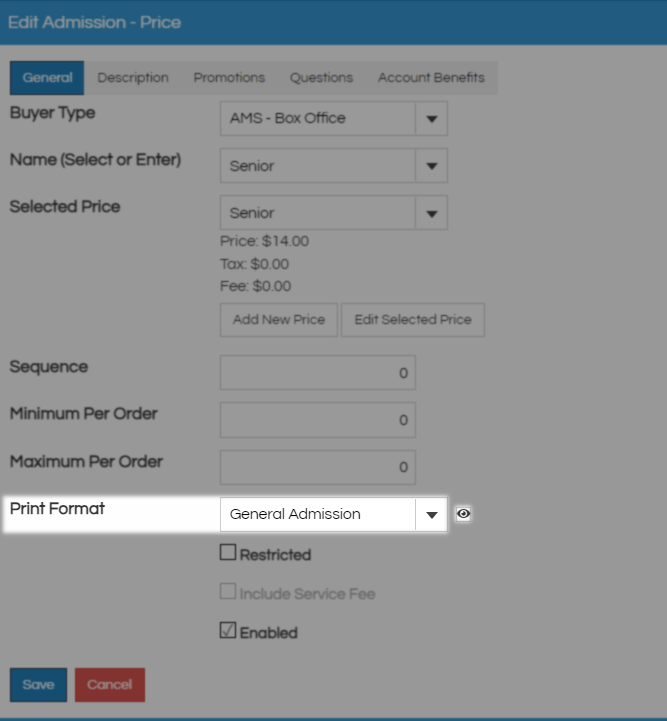
Check the Restricted check box if this price should only be available to certain groups or individuals. Once checked web online customers will only have access to this price with a benefits or promotion code. Include Service Fee will attach a prebuilt service fee to this price instead of building that into the price up above. Leave Enabled checked to make this an active price point and click Save to create this new price. Repeat these steps as needed for additional buyer types.

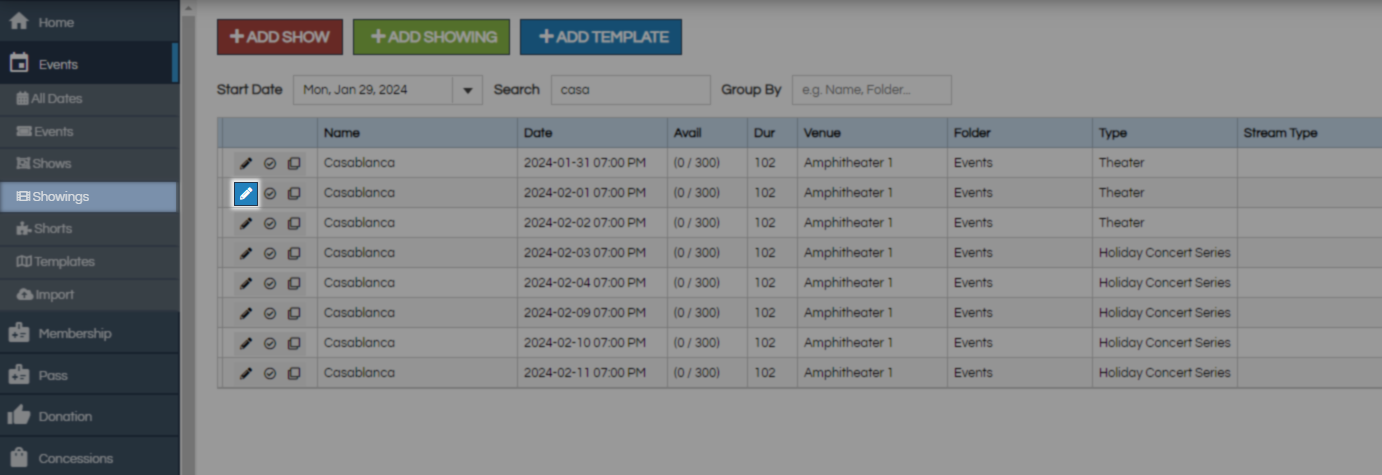
If you skipped the Set on Sale check box but are now ready for this showing to go live it is time to set your sales channels. Open up your Showings and click the Edit Pencil next to the showing you want to put on sale.
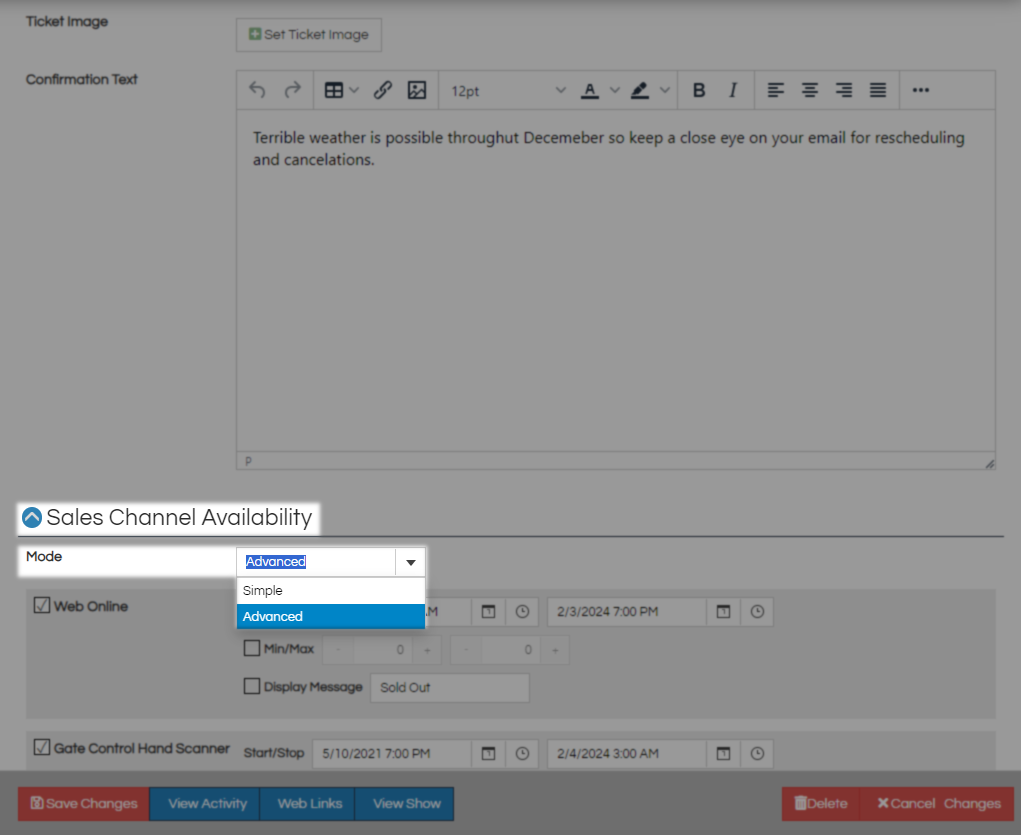
Scroll all the way to the bottom where you will find the Sales Channel Availability section to activate your Sales channels. In the Mode field select Simple to turn all channels on at once and Advanced to set them separately.
Put a check next to each Sales Channel you would like to activate.
AMS Box Office - Prices available in your box office.
Gate Control Hand Scanner - Prices available to your iPhone scanning devices.
Web Online - Prices available to your online customers.
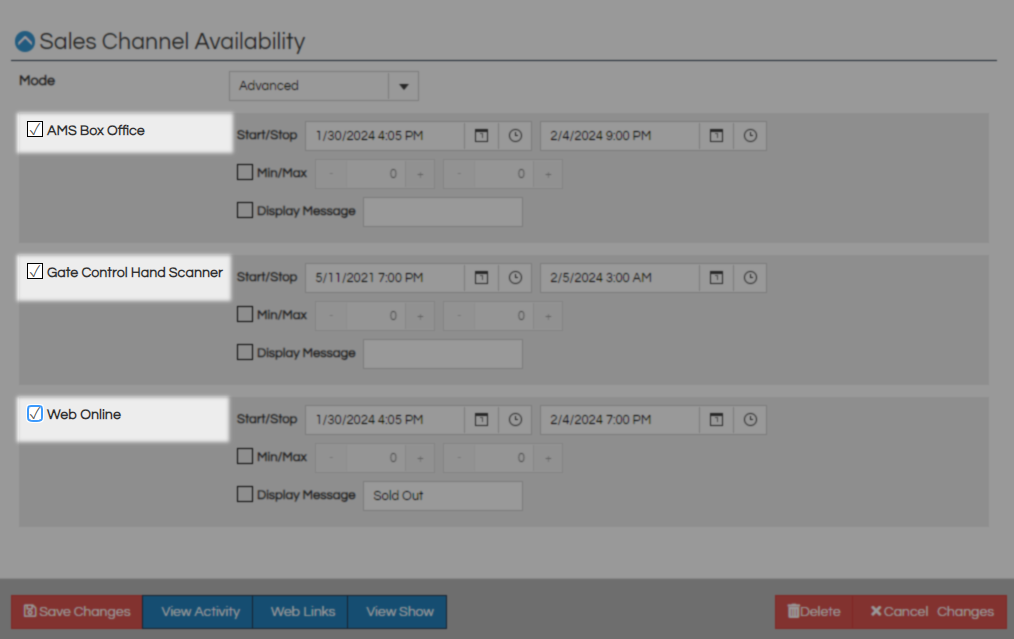
In the Start/Stop fields, the Start is when your ticket will go on sale and the default is today but you can set it for any specific date you would like past or future. Stop will be handled by the system according to rules set under Buyer Type in your Pricing folder but can be adjusted by hand also. Use the Calendar buttons or type in these fields to make changes.

The Enforce Minimum / Maximum field is used to set a total amount of tickets that an order must fall within on this sales channel. Customers not meeting this requirement will get a message explaining they are under or over the required purchase amount.

Check the Display Message box if you want to force the message in that field to display in place of a buy tickets button on this showing. This is useful if you need to deactivate a sales channel where a purchase has been made.

Advanced Event Settings: Renewals
A show Renewal allows you to offer returning customers the same seats or tickets they had during the previous year or event.
Begin by making sure your new showing is built to resemble the previous showing, using the same template and venue is advised for reserved seating events but is less important for general admission. Click the Edit Pencil next to the showing that customers will renew into.

Scroll down to the Additional Information section and find the Renews From field. Do a search for the previous showing and select it.

The previous show will now be displayed. Click Save Changes to save this relationship.

The next step is to have the system place all of the previously sold seats or inventory on some kind of hold. This step must be done from the Admin side of the windows app. Locate your events folder and Right-click the new event and select Event Renewal Hold.

Use the magnifying glass beside Event Data to Match to locate the event with previous sales.

Choose the folder your event is built in, and if needed, adjust the date to before this show happened. Once your shows load in the bottom field, select the previous showing and click OK.

Using the Inventory Group to Set drop-down, pick the type of hold you want to place all of these seats under. Best practice here is to use a hold type just for renewals but any hold type will suffice. Click Apply to have the system place all corresponding seats on hold and give you a message of success then OK to close this window.


You now need an entry point that will allow your customers to access this held inventory, as the system will only sell open-status inventory by default. In the Settings menu, scroll down to Websites and Apps, then click on Internet Sales.

Click Add New Page and then under the Renewal heading select Renewal: Event/Show.


Give this entry point a Name and Display Group, if you check Include in navigation down below these will be customer-facing.

At Event search for the current one that customers will be buying tickets for. For Renewal Start and Renewal End put the length of time you are allowing customers to renew before you open this inventory to the public. Leave Enabled checked and click OK to create this entry point.


You can now copy this link for the last step of the process, which is to alert customers and allow them to purchase. Use the copy Chain Link button to copy this to your clipboard.

In the Customer Relations section of the side menu click Emails and Letters then click the red New Email/Letter button. Using the Query Data Set drop-down to find Event - Renewal/Different Status then click Continue.


When the Edit Target Audience window opens do not check the Renewed / Purchased Current Events Yet, activating this will have the system contact only people who have completed the renewal process. Expand the area for Previous Event and Current Event to select those from your event list, then click Accept.

Use as many email features as you would like and include the link for the renewal entry point.

Here is what that looks like when the customer receives it and what the renewal page will look like once they click the link.


Repeat this process for each show that needs to honor renewals.