Cashing In and Out
How to cash in for business and close out a drawer at the end of day.

Table of Contents
S)On the sales side of the Agile Ticketing system, there are three platforms you can use to create or make changes to orders which are Agent Managed Sales,(AMS) Point of Sale (POS), and Web Box Office. Before you can cash in to any of the following platforms you will first need to log in, you can use These Instructions to help with that process if you are unfamiliar.
Agent Managed Sales is where you land when you sign into the Agile App and choose the Sales toggle instead of Administration. Any sales you do are being processed on this screen.
Cashing in/out in Agent Managed Sales (AMS)
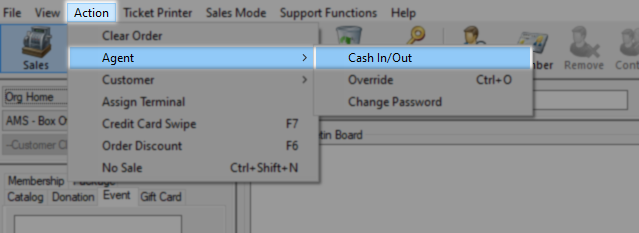
Once logged in to Sales click Action along the top bar and select Agent then Cash In/Out.

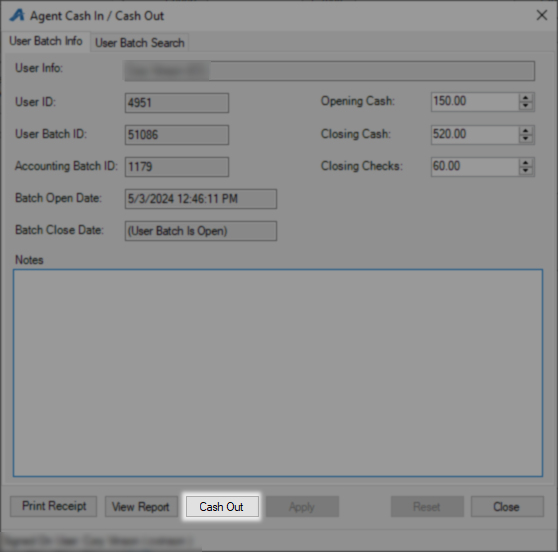
On the Agent Cash In / Cash Out screen these fields will either be mostly blank or contain figures from the last time you were cashed in. Click the Cash In button to start a new user batch.

Cash In button grayed out
This is likely because of not having a terminal assigned to this workstation. You can use These Instructions to set up and link a terminal to this hardware or contact your support rep. New terminals may incur additional monthly charges based on your contract.
A Batch Details window will open, if you are using a cash drawer and have an opening till amount you should enter that now in the Opening Cash field. Shift can be used to record that here on the batch and will be shown on the consolidated cash out report, use the ellipsis to add more shifts to this list. You can skip both this step if you are not working with cash or recording a shift by leaving them blank.

You can return here and make any needed changes to the batch screen by clicking Edit Batch. Click Close to return to the sales screen.

Now a look at how to cash out, return to the Agent Cash In / Cash Out screen and click Cash Out.

Enter your total cash in the Closing Cash field and the total for all checks in the Closing Checks field. Click Cash Out to commit these figures.

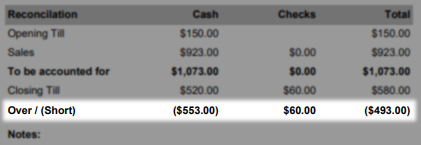
Click View Report to make sure that your drawer is balanced.

In the Reconciliation area at the top of the report, you should have 0's for everything on the Over/ (Short) line. Should you not balance consider recounting your drawer, modifying the closing amounts to reflect your updated count, and rerunning this report.
Once you are done counting you can click Cash Out to close this batch.
From Admin Sales you can Launch the PoS screen which is the touch-optimized in-house sales platform. When you purchase a hardware bundle this is the platform you are preparing to work on.
Cashing in/out in Point of Sale (PoS)
Once logged in to Sales click Point of Sale along the top row.

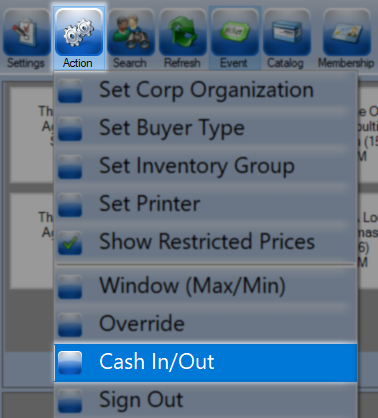
Next, Click Action followed by Cash In/Out.
On the Agent Cash In / Cash Out screen these fields will either be mostly blank or contain figures from the last time you were cashed in. Click the Cash In button to start a new user batch.
Cash In button grayed out
This is likely because of not having a terminal assigned to this workstation. You can use These Instructions to set up and link a terminal to this hardware or contact your support rep. New terminals may incur additional monthly charges based on your contract.
A Batch Details window will open, if you are using a cash drawer and have an opening till amount you should enter that now in the Opening Cash field. Shift can be used to record that here on the batch and will be shown on the consolidated cash out report, use the ellipsis to add more shifts to this list. You can skip both this step if you are not working with cash or recording a shift by leaving them blank.
You can return here and make any needed changes to the batch screen by clicking Edit Batch. Click Close to return to the sales screen.
Now a look at how to cash out, return to the Agent Cash In / Cash Out screen and click Cash Out.
Enter your total cash in the Closing Cash field and the total for all checks in the Closing Checks field. Click Cash Out to commit these figures.
Click View Report to make sure that your drawer is balanced.
In the Reconciliation area at the top of the report, you should have 0's for everything on the Over/ (Short) line. Should you not balance consider recounting your drawer, modifying the closing amounts to reflect your updated count, and rerunning this report.
Once you are done counting you can click Cash Out to close this batch.
Web Box Office is launched from the Web Portal and only requires a web browser. In this sales mode, you are limited to purchasing on behalf of a customer or performing a full refund.
Cashing in/out in Web Box Office
Once on the Web Portal home screen click the Box Office button on the left menu bar.

Select the Terminal Key Name from the drop-down. NOTE: The Terminal Key Name is different from your Domain name. If you do not have a Terminal Key Name, please contact your Client Support Rep.

You should now be on the login screen and can enter in your Shift and Opening Cash drawer amount if any and click the Cash In button.


Once your day is over and it is time to cash out you will need to click your user profile and then User Info to get back to the Cash In/Out page.

Back on the Cash In/Out page you will count your drawer and then enter the total cash into closing cash and the total checks into closing checks. Click Save Changes and View Report to see if your drawer is balancing.

In the Reconciliation area at the top of the report, you should have 0's for everything on the Over/ (Short) line. Should you not balance consider recounting your drawer, modifying the closing amounts to reflect your updated count, and rerunning this report.

Once you are happy with how your drawer is balancing click Cash Out to finalize this process. You may now close this window.
