New Reserved Seating Chart
Reserved seating applies to any event where customers will have assigned seating positions
Reserved Seating refers to any event or show where you will allow customers to pick their own seats. The ATS system is capable of doing single or multi-section seating maps and can incorporate overlays or use a default seating chart. You can also use Reserved Seating to set up and sell tables.
Reserved Seating can currently only be done from the ATS App so begin by Logging In there.
Before beginning your build of a new reserved seating chart you will need to check and make sure that two things are in place and ready to go. First is on the Web Control tab which you will find at the Event, Showing, or Template level. Once you have that open make sure Allow Seat Selection on Web Sales is checked and then choose either Seat Selection or Clickable Section from the Ticket Search Type drop down. Seat Selection will be for single section maps as where Clickable Section will be for multi section maps.

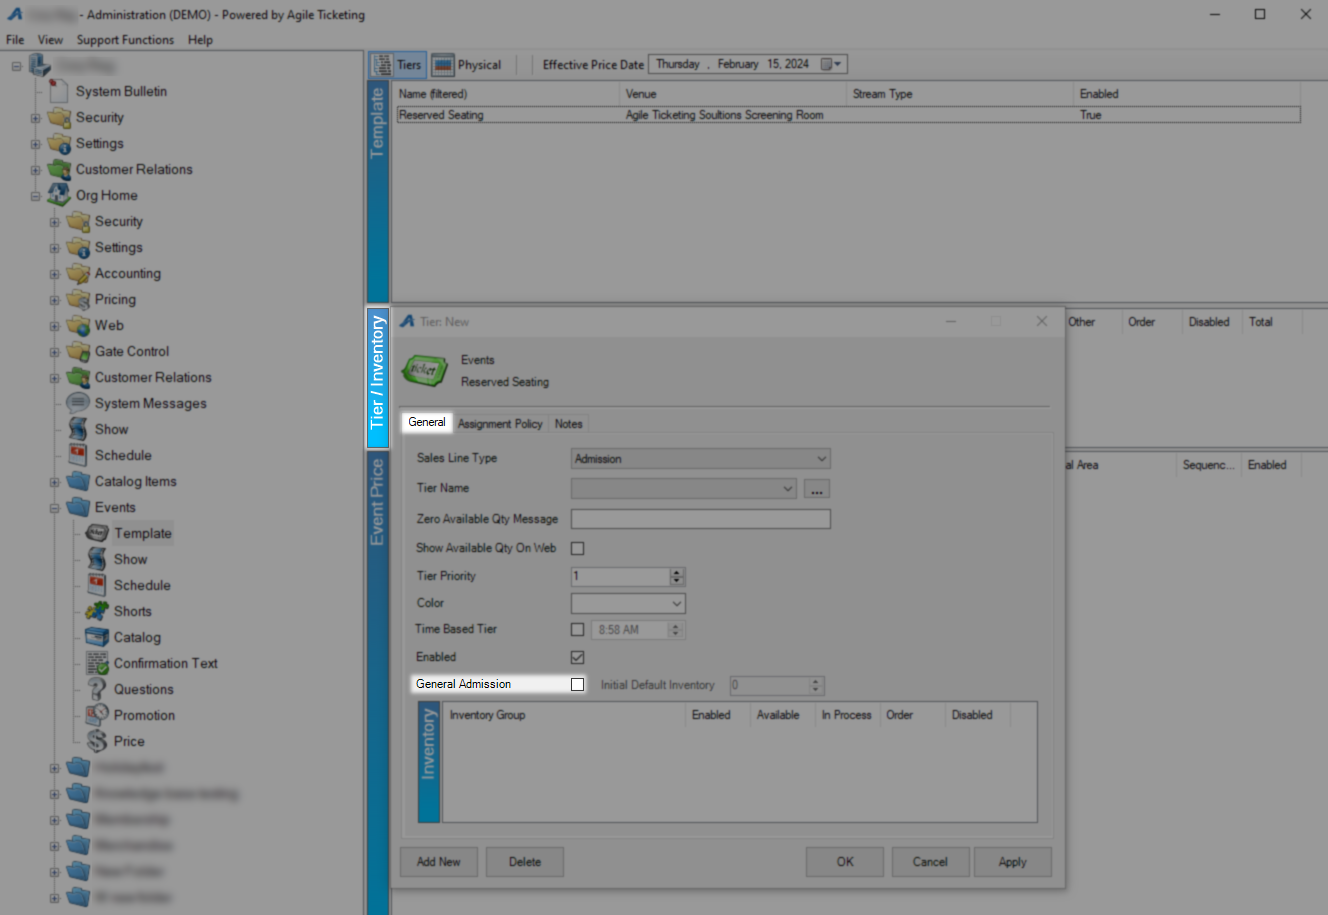
Next is a Tier/Inventory that must have General Admission disabled so that the system can pull inventory from the chart. You can uncheck that box on the General tab.
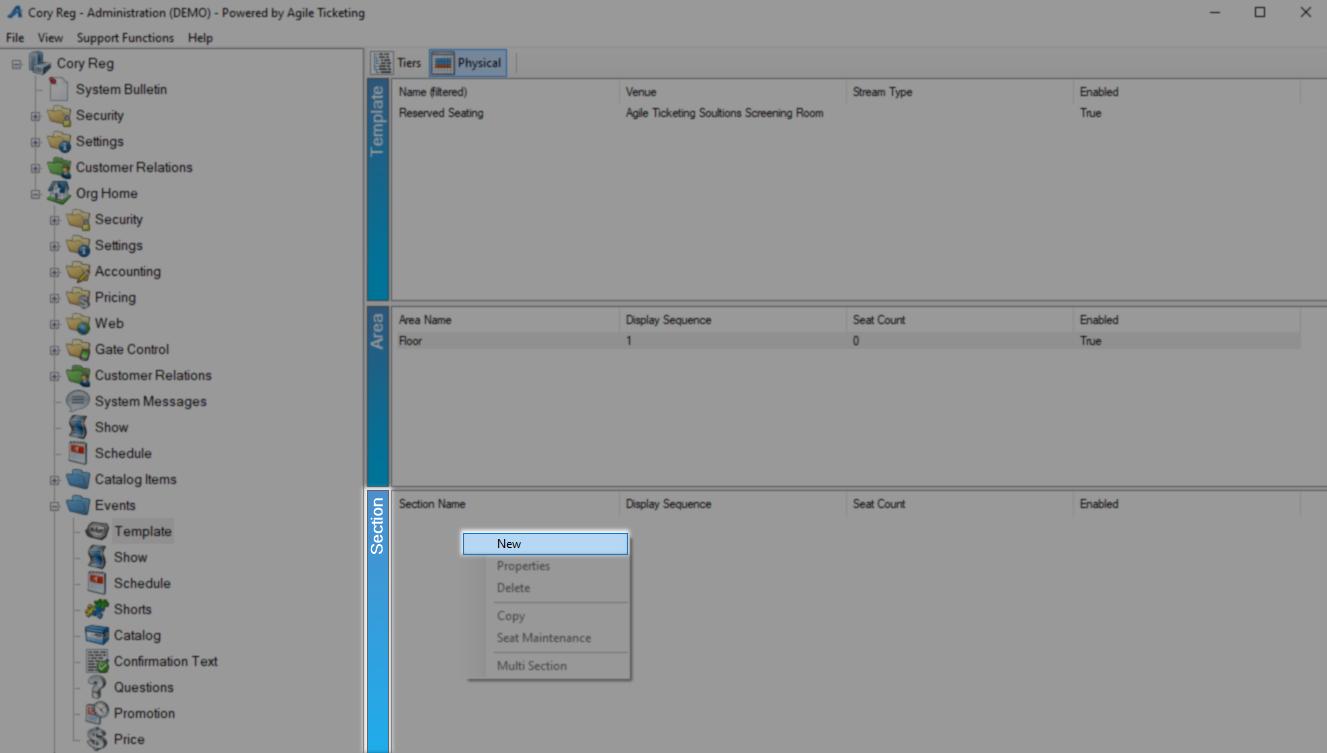
With both of those settings in place you can start the build on the seating chart. In your Template, Show, or Event section of the system swap from the Tiers view to the Physical view. Once the new Area field appear right click in it and select New.

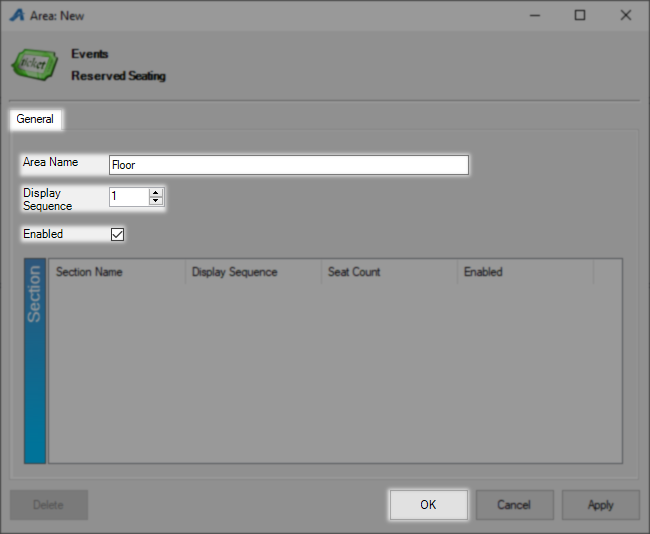
On the General tab first give this area an Area Name. This should be something like Floor or Balcony and will still contain multiple sections if needed. Display Sequence will determine where on a list this Area would fall with lower numbers being toward the top of the list and alphabetical being the fall back method. Leave Enabled checked or this Area will not be available and click OK to save this area.
Make sure the Area is selected and then in the Section field right click and select New.
On the Section: New window you will find all the options to define how big this specific section will be starting with the Name. In this example the Floor is going to be one large section but could be broken up into front, middle, and rear or any other scheme by adding additional sections.

Display Sequence determines where on a list this section will fall with lower numbers being higher on the list and alphabetical being the default otherwise. in the Row Type field select if this map will contain Rows of chairs, Tables with individual seats, or Boxes which include a certain number of seats. Row Description will fill in for you based on the Row Type but can be changed if you would like.

For the next two fields take a look at the section you are about to build and figure out which row has the most seats and how many rows you will have. When counting your max row and seat size be sure and count aisles and other empty spaces you would like to account for on the map. Max Seats in Row should be set to your maximum row size and best practice is to make it bigger than that if you think this venue seating could change. Max Rows in Section is how many rows you will have and again can benefit from using a larger number so that extra space exists for later if it's needed. In this example 25 seats and 10 rows are needed so both of those numbers have been increased due to a middle aisle and future growth projections.
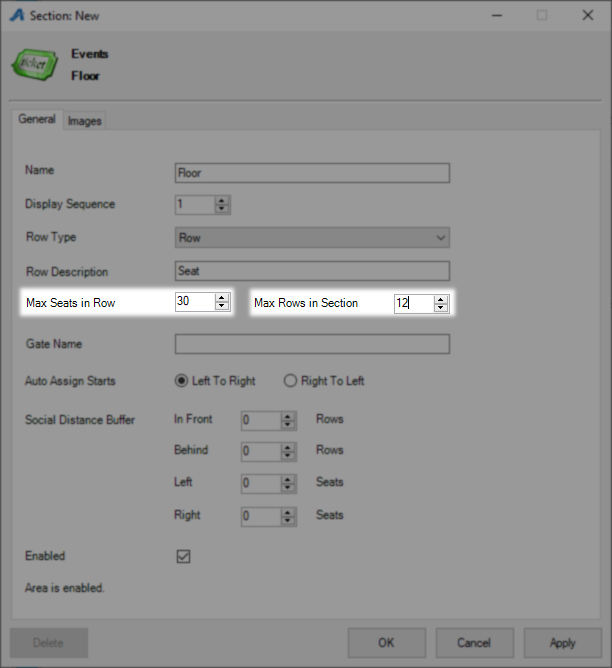
Gate Name refers to a scanning location and will be used on reports if you are scanning tickets to identify where that scan happened. Auto Assign Starts should be set to whatever your numbering scheme is so that auto assigned seats will follow that pattern. Social Distance Buffer will only be used if you need to maintain a bubble of empty seats around each one you sell. Leave Enabled checked or this section will not be available once you are done building it. Click OK to save and close.

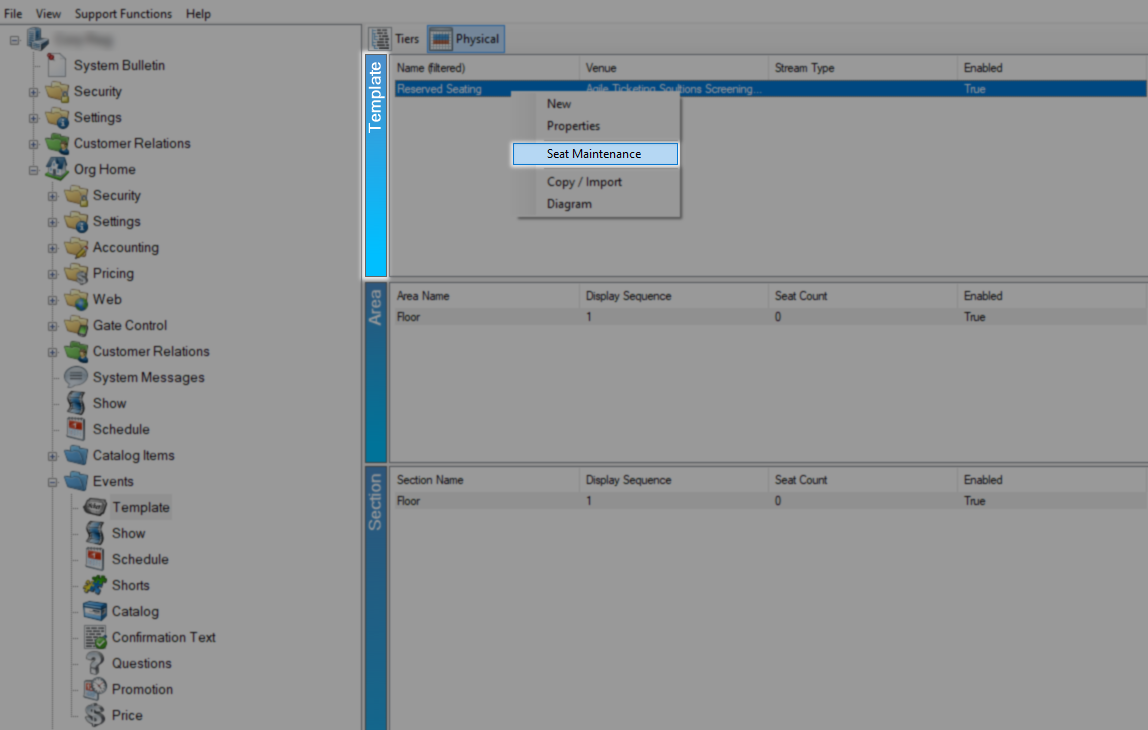
Back at the top of your Template, Event, or Showing right click and select Seat Maintenance.
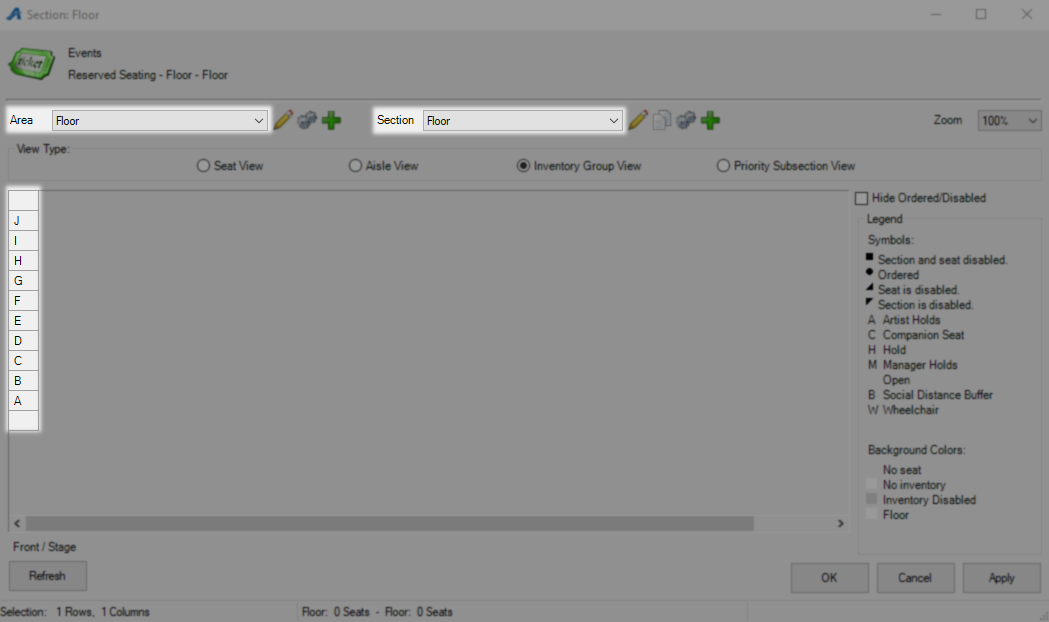
On the Seat Maintenance window you will have drop down menus for the Area and Section which you should make sure are correct for what you are building. Below that is an empty grid as defined in the previous steps, click on the Column of Grey Boxes to the left and place the letter or number for your first rows. When placing your rows keep in mind any empty space you left yourself and that by default the stage/screen is down. To instead have the stage/screen be up get with your support rep or use an overlay which will be covered in advanced setup.
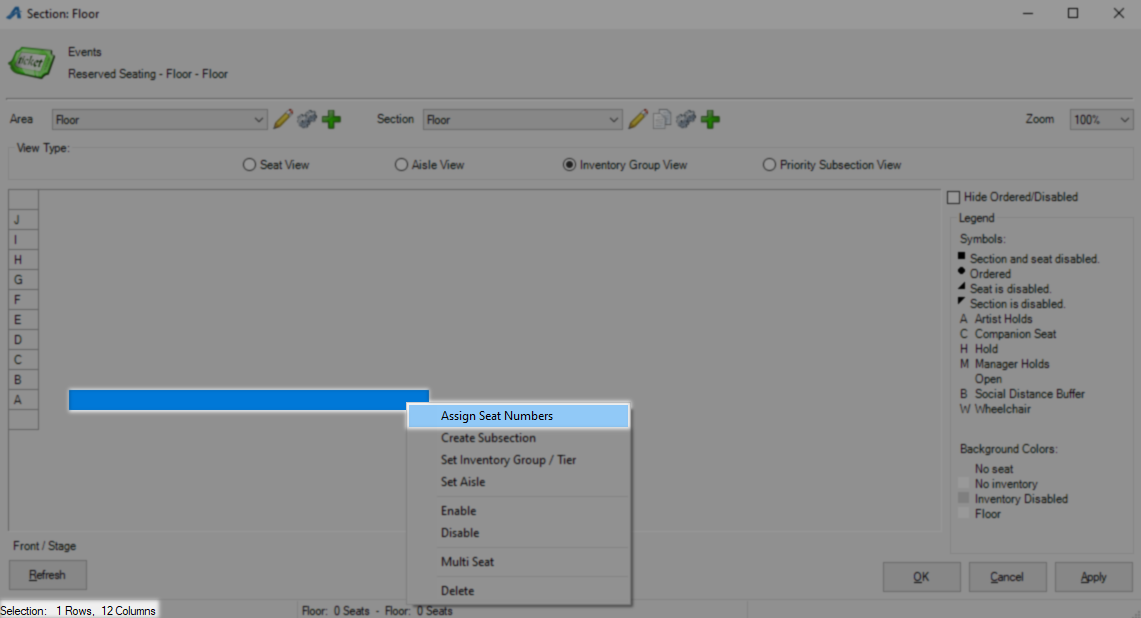
Next select your First Row of Seats by using your mouse to draw a line or box around them making sure not to select where the aisles will be. You can use the Selection Tracker on the bottom left to help you count the number of seats you currently have selected. To assign these seats numbers right click on them while selected and pick Assign Seat Numbers.
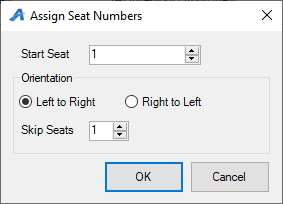
On the Assign Seat Numbers window in the Start Seat field put the number of your first seat. In the Orientation section choose if you want the system to count up moving to the left or the right for this row. If you need even or odd numbers for your row use the Skip Seats field to select how many numbers will be skipped after your starting seat number. Click OK and you will see those seat numbers on your grid.
Skip your aisles and repeat these steps until your first row is complete.
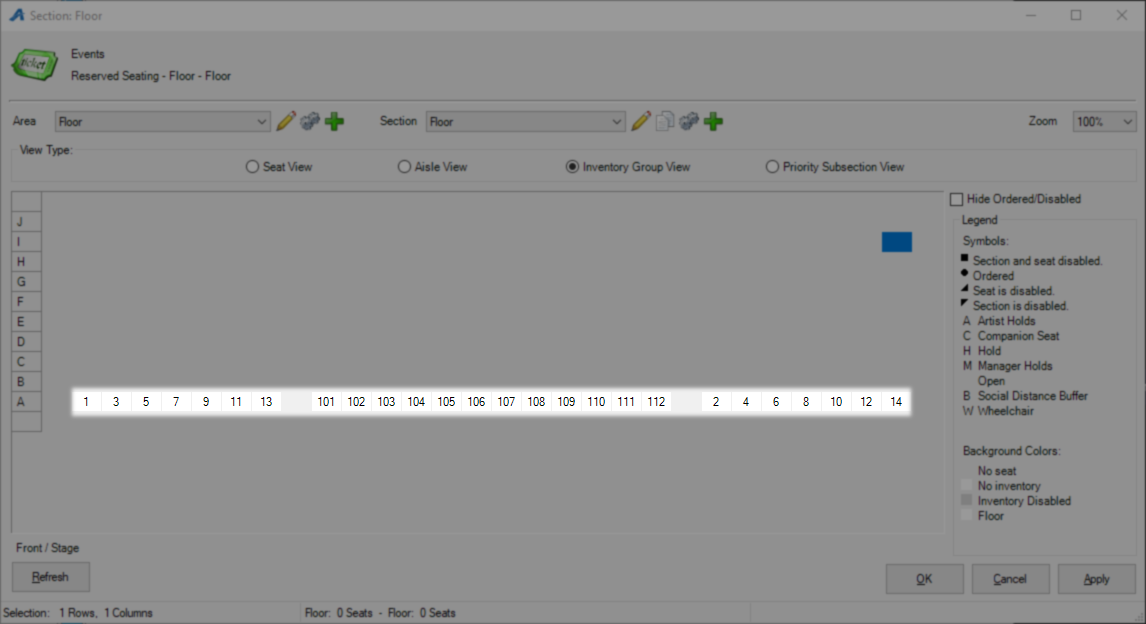
Now that you have placed your aisles and can be sure the layout is correct you can finish up by drawing a box around the whole section as long as the number scheme is the same. This is ideal for doing the blocks of seats along the sides or in the middle all at once. Right click and use the Assign Seat Selection button following the same steps as before to number them.
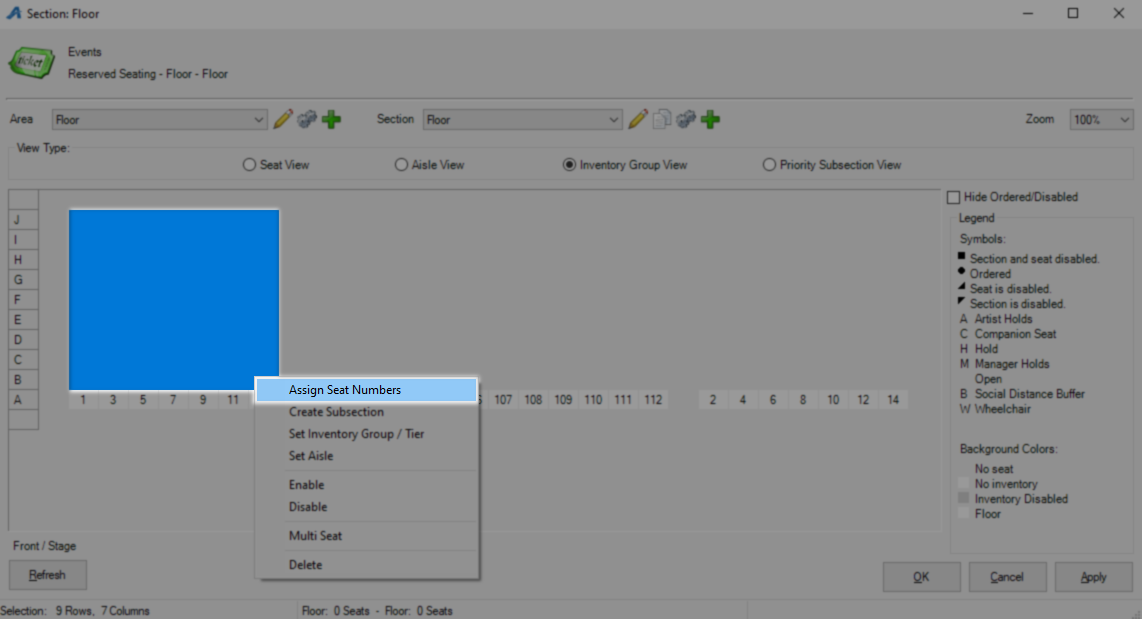
Repeat all above steps as needed until your whole seating map has numbered seats and lettered or numbered rows.
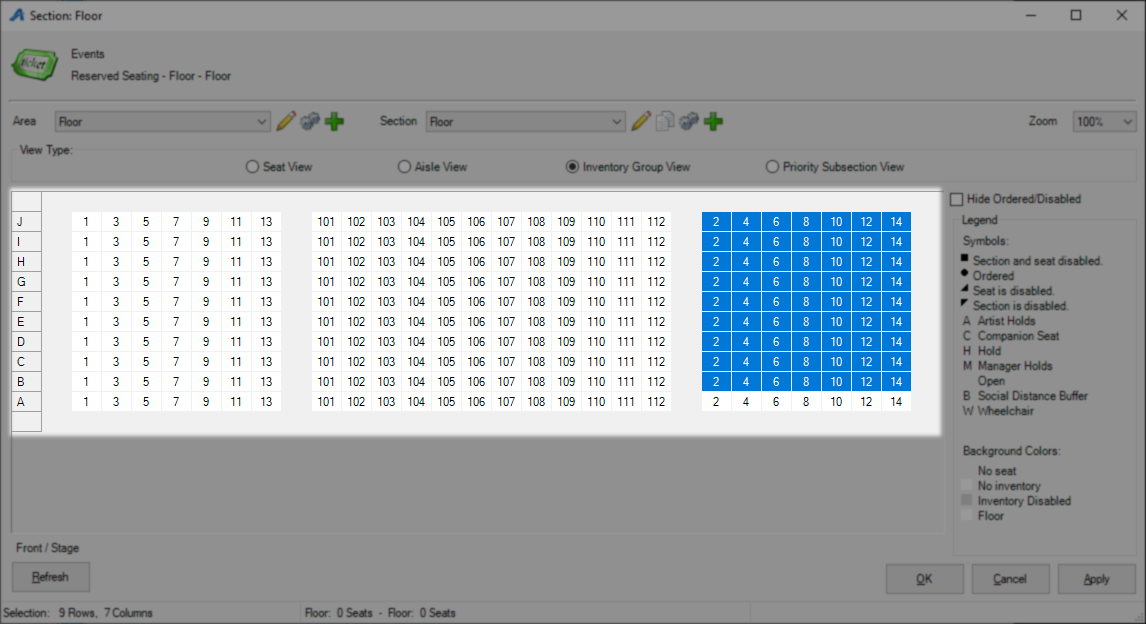
For the next step you have to assign a subsection to all of your seats so that if the system has to assign them automatically it will know in what order to do that. This is determined first by the subsection and next by the seat number with the lowest numbered subsection and seat numbers being used up first. Click the Priority/Subsection View selector to see your current settings and then use your mouse to draw a box around the first section you want to create. Right click and choose Create Subsection to make that assignment.
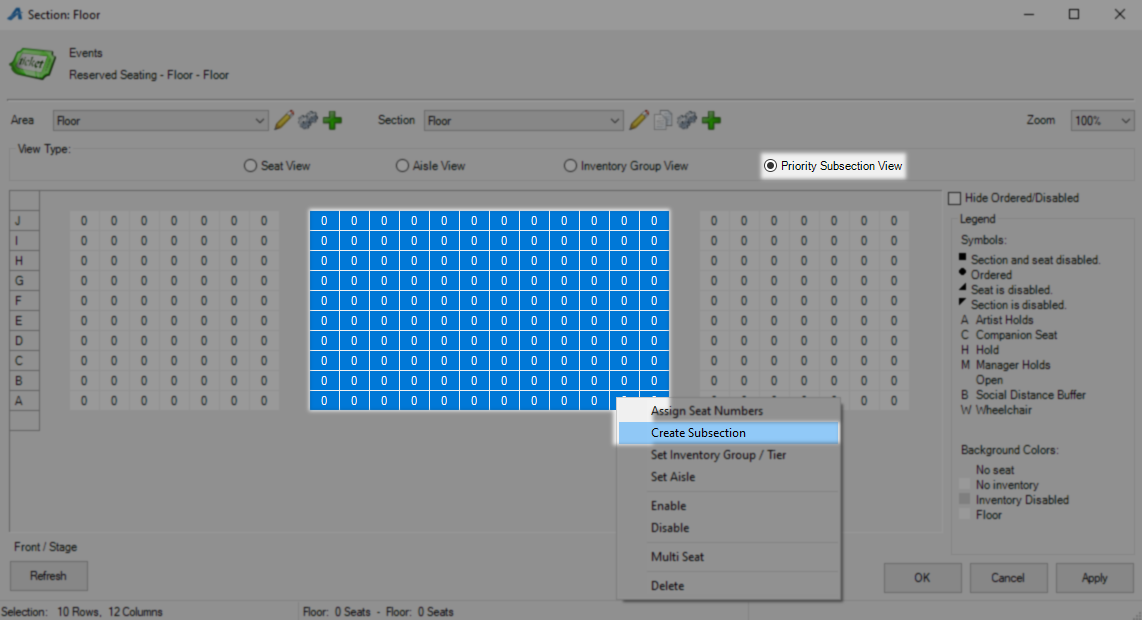
On the New Subsection window give this subsection a number greater than zero and click OK.
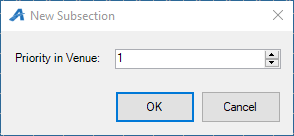
Repeat this process for all seats until they all have a subsection. You may reuse a subsection number as many times as you would like.
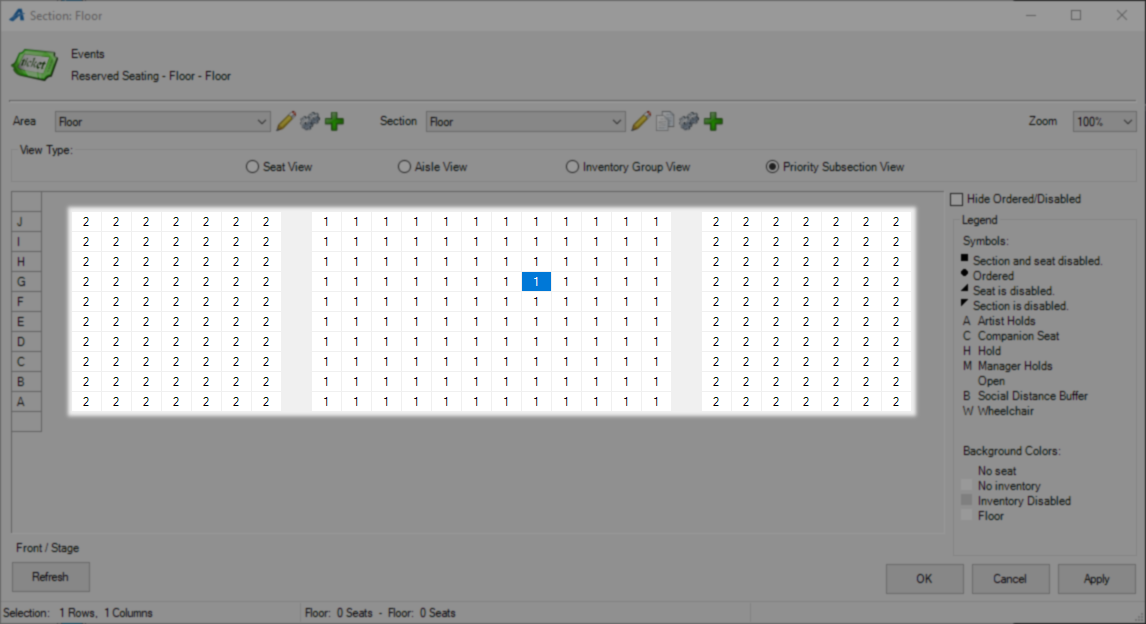
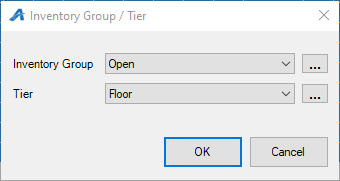
Now that your seats have a number and subsection they need to be placed into an inventory pool so the system knows which ones are for general purchase. Start by putting all of the seats you want to be on sale in the open inventory tier. Right click and select Set Inventory Group/Tier.

On the Inventory Group/Tier window Inventory Group should be set to Open and Tier is the Tier/Inventory where your prices for these seats are built. Click OK and then repeat this process for any holds or ADA seating you need to set aside.
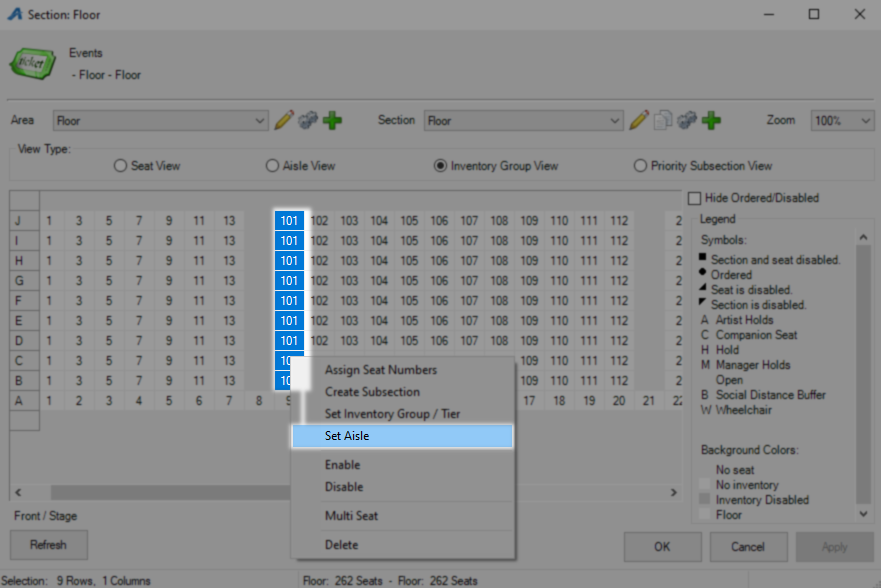
The final option of Set Aisle is used to designate a seat as an aisle seat but can be used for other designations as desired. When the Aisle element is included on a ticket format this is where it pulls from.

This section is now complete and ready for use. Click the OK button to save and close this section. To add a section overlay or overhead map proceed to advanced seating below.

Advanced Seating Map Settings - Section Overlay
Once you have built your sections and seating maps you can further customize them by adding an overlay. This overlay will be what customers see when they are picking where to sit online or on any customer facing PoS displays.
To start this process you will need either a map with all your seats in one place or you will need individual maps for each section and an overhead map showing all sections.
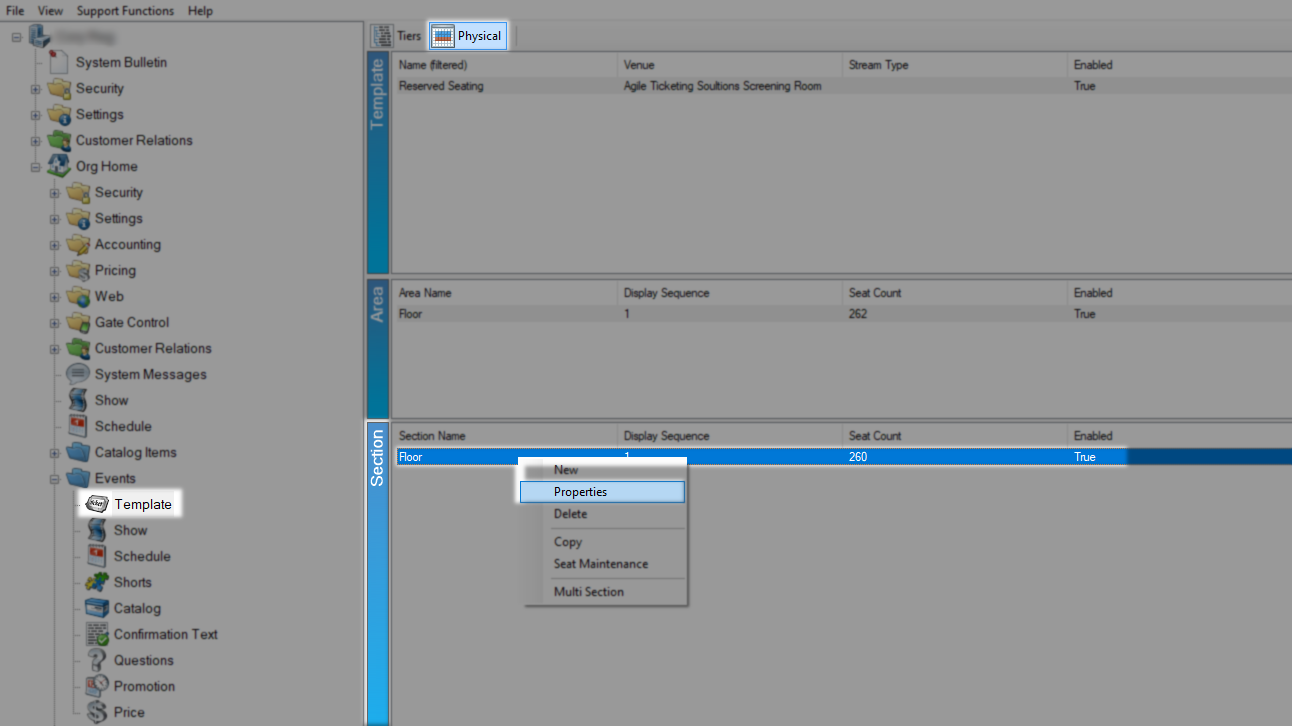
Locate the Template, Showing, or Event where you will be adding an overlay and swap to the Physical view of that selection. In the Section area locate the first one you want to add an overlay to and right click it so you can select Properties.
On the Section window swap to the Images tab. Use the Blue Up Arrow to upload your overlay by locating it on your hard drive and then clicking the Open button. You will likely get a pop up about image size simply allow it to resize your image or do so yourself to continue.


Your image should automatically select but if it does not or if your map image has already been uploaded you will now find it in your Image Library on the left. Once selected it will appear in the Show Selected window, you can now click the Add Image Map button to create the overlay.

The Image Map Editor window will open and display your map, to better place nodes on this map it is advised to increase the Zoom using the drop down at the top and go to either 200 or 400 percent.

Now that you can more easily see individual seats it's time to place nodes on them that customers can click. The three methods of placing a seating node are as follows and are all found at the top left.
Create Rectangle Node - This will let you draw a square or rectangle by using a click and drag motion starting in one corner and moving to the opposite corner. This method works best when your seating rows are nice and straight.
Create Circle Node - This will let you draw a circle by using a click and drag motion starting in the center and moving your mouse left or right to increase the size. This method is great for circle shaped seats but also good for uneven rows of angled boxes as you can fill most of the clickable space without going outside or into another seat.
Create Polygon Node - For any space not covered by the other two methods you have the ability to create a shape of unlimited sides. To create a new polygon node left click any corner of your space and proceed in a circle from there clicking each corner as you go and placing an anchor point. At the last corner before returning to your starting location use a double click to close the loop. This process is mostly used when mapping out the various sections on an overhead map but can be used on seats also.

Now that you have picked how to place your nodes you should make sure you are on seat 1 or on whatever seat you are working on at the Seat Name drop down menu. Check the Auto Advance box or you will have to return to this menu between every seat to select the next one.

With all of those settings in place you may begin node creation, watch the Seat Name drop down menu as you create making sure it always displays the seat you are about to place. As you create seats they will appear in the Seat Info window on the bottom left.

Commonly when placing nodes you will make little mistakes regarding placement or size. No matter what action you want to perform on a node you have already created you must click that node in the seat info section. Any time you click in the node placement area you will create a new node. When you have simply placed a node off center but it is the correct size you may move it using the adjustment arrows at the bottom of the window. Click the seat you want to move in the seat selection window then move your mouse over the map without clicking and use the Move Selected arrows or your keyboard arrow keys to make adjustments.
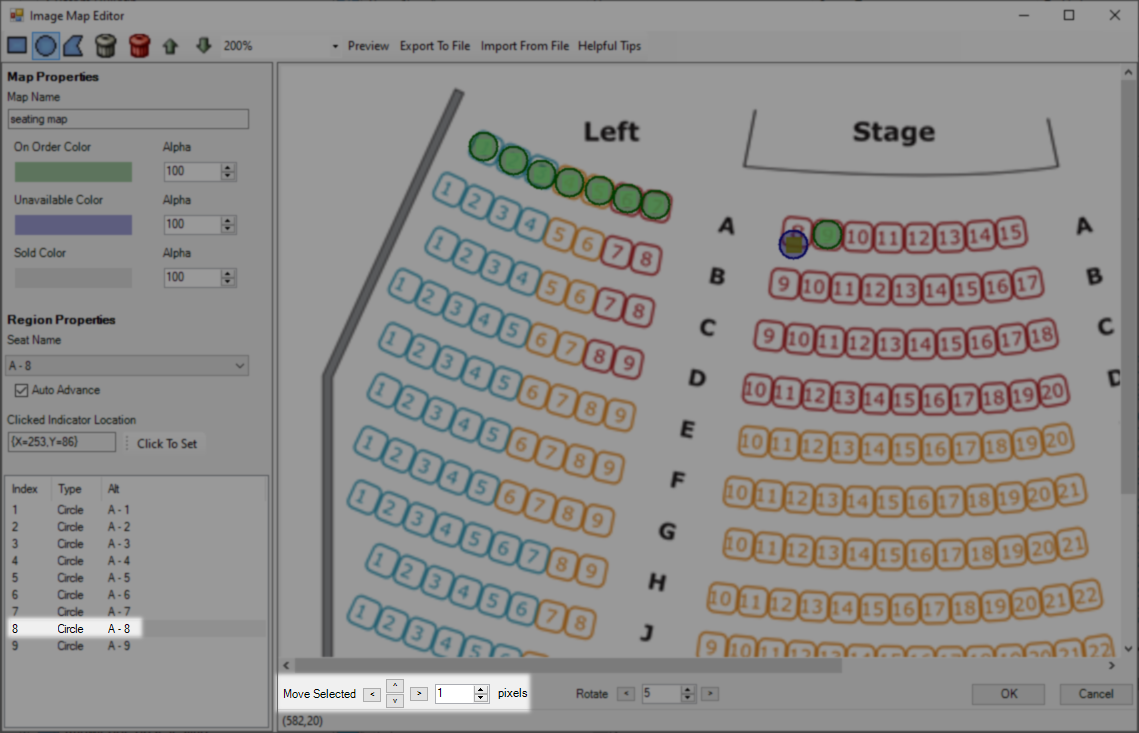
Should you make a node to big you can not resize and must delete and recreate it. To delete a node select it in the seat info window and either right click it then select delete or use the Grey Trash Can icon along the top bar. Once you have deleted a node move the Seat Name menu to that seat and replace it on your map.

Repeat this process until you have a node on every seat on your map. It is best practice to click the Apply button every few rows to save your work as anything that disrupts your building will leave you with starting over from your last save. When you are done click OK to save and close your seating map overlay.
Advanced Seating Map Settings - Overhead Map
An overhead map is built very much like a Section Overlay so reference that article for the tools you will need for this process. Begin at the Template, Show, or Event level and open that up by selecting properties then navigate to the images tab.

On the Images tab select the Overhead Image section by double clicking the area and finding it in your image library or upload your image with the blue Upload arrow. As you upload let the system create a thumbnail image unless you have one already prepared.
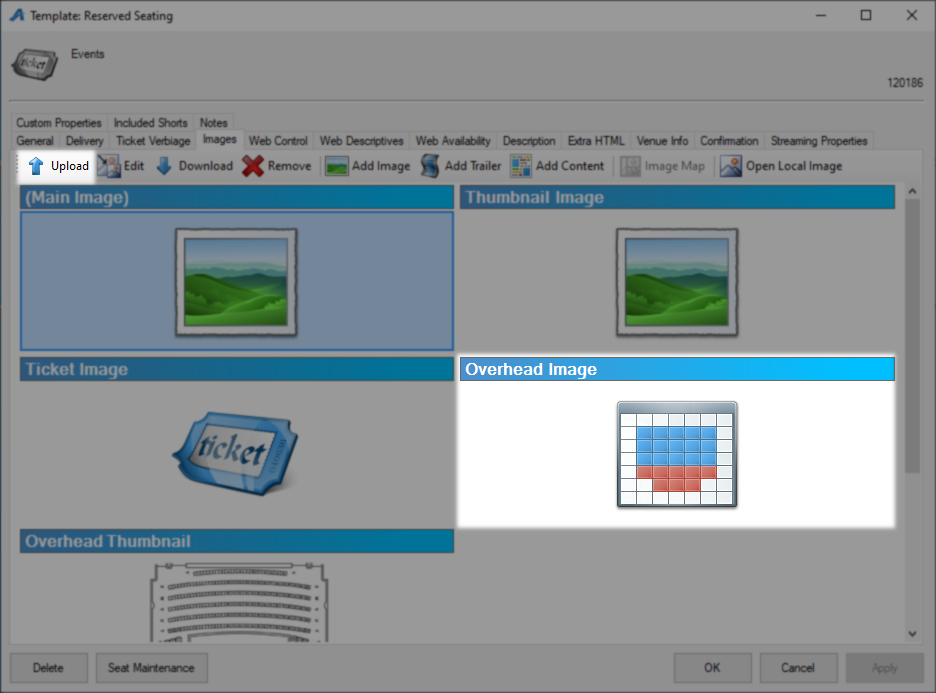
Once your overhead image is in place and selected you will be able to click the Add Image Map button.

On the Image Map Editor window you need to define the area of each section. Start choosing which section you want to build with the Section Name drop down menu and then pick the tool you want to define that area with. Since this is the area customer will click in order to load a seating map it's better to have to much area included than not enough so long as you don't overlap the borders.

Lastly change your Section Name to the next one you want to build and repeat these steps until you have no sections left to place. Click OK once you are done to Save and close then move to the Web Control Tab and make sure the Ticket Search Type is Clickable Section to account for your new overhead map. Click OK one last time to save all settings and close.
